💈 12. Setup Hair Highlight Mask
This page uses two character models as examples for setting up hair highlights:
==============================
- オリジナル3Dモデル『セリア』 -
==============================
※ 本モデルはAvatar3.0専用に設計されています、 必ずSDK3を使用してアップロードしてください ※
本モデルは「Unity 2019.4.31f1」、「Blender3.2.1」で作られていますので他のバージョンの動作は保障いたしません。
以下に利用規約やモデルについての説明等が記載されておりますので、 ご購入の前に必ず一読してからご購入をお願いします。
==============================
◆ 商品内容 ・ FBX ・ Blenderファイル ・ 改変用PSD ・ 改変用CLIP ・ 專用アイコン ・ PNGテクスチャー ・ Unity package
◆ モデル情報 ・ ポリゴン : セリア ㅿ69,401 装備 ㅿ5,268
・ シェイプキー : 表情制作用:168 その他:91 MMD:39 盾 : 11
・ メッシュ : セリア:22 剣&盾:3
・ マテリアル : セリア:10 剣&盾:2
・ テクスチャー : 7 Mask : 5 Normalmap : 3
・ シェーダー:liltoon1.3.1 / K13A_Labs/Consellation_Shader
・ アイトラッキング:対応
・ リップシンク:対応
・ フルトラッキング:対応
==============================
◆ 導入方法 本アバターはUnity 2019.4.31f1と「VCC (VRChat CreatorCompanion)」を使って設計されています。
「Create New Project」をクリックして「Avatars」を選べ、 「Create Project」を押して新しいプロジェクトを作成してください。
本アバターは「Modular Avatar」を使用しています。 DLはこちらから↓ https://modular-avatar.nadena.dev/
「Manage Packages」から最新版のVRChat SDK -AvatarsとModular Avatarのバージョンを選択してインポートします。 インポートが終わったら「Open Project」をクリックします。 liltoon Shader、アバターのUnitypackageをインポートした後、 Assets - (アバター名) のフォルダからPrefabを選択してHierarchyにドラッグアンドドロップします。
上段メニューのVRChat SDK - Show Control Panel - Builder - Build & Publish for Windowsの順にクリックしてアバターをアップロードします。
==============================
▶利用規約◀ 本モデルを購入する際、この約款に同意したものとみなします。 利用規約の内容は変更される場合があり、最新バージョンを優先します。 本規約は、あしやまひろこ(@hiorko_TB)氏が作成したVN3ライセンス( https://www.vn3.org/ )のテンプレートを使用しています。
利用規約(JP) https://drive.google.com/file/d/1TRecLeI5y2-gKTWsqe8eyg91Gsp7X-BF/view?usp=sharing
Terms of use(EN) https://drive.google.com/file/d/1IuF8SSJPpjs2Isb-_NYFTuBwZEkeCpPv/view?usp=sharing
이용규약(KO) https://drive.google.com/file/d/1UlzhauxNmYnrzDg6WcouKJDb11k1sEZH/view?usp=sharing
使用条款(ZH) https://drive.google.com/file/d/152J3kZUwc8r-3Unp53ApSz8R4g9L9J6N/view?usp=sharing
◆連絡先
その他ご不明な点や不具合等ございましたら、BOOTHのメッセージまたは下記までご連絡下さい。
Twitter : @haminin_ https://hamini.booth.pm/
==============================
2022/08/06 ▶ Ver 1.00 ・ 販売開始
2022/08/19 ▶ Ver 1.01 ・ ArmatureのScaleを調整 ・ Prefabの基本ポーズをTポーズに変更 ・ シェイプキーOppai_size_small、High_Heelsを追加
2022/12/23 ▶ Ver 1.01 - Hotfix ・ シェイプキーeye_option_~のハイライトの問題を修正
2023/11/20 ▶ Ver 1.10 ・ モデルの剣と盾を「Modular Avatar」に対応
「暮井 慧(プロ生ちゃん)公式 MMD/VRM/FBX/Blend」 / 5zj さんの作品 - ニコニ立体
アプリ・ゲーム・デモ・動画などで使える「プログラミング生放送」のキャラクター、プロ生ちゃん! 都内の公立高校に通う高校生。部活は、情報処理研究会。身体を動かすのも好き。暮井 慧(プロ生ちゃん)https://kei.pronama.jpTwitter: @pronamaCharacter design: Ixy, 兎塚エイジ CV: 上坂すみれ, 3D model: micco, 銀獅, 如月zMMD/Blender/FBX/VRM2021年10月: 通常(制服)Ver.4 モデル公開(Blender, PMX, FBX, VRM)通常(制服)、Tシャツ姿、SD の3種類を新しく公開(Ver.3 モデル・2016/9/26 以降公開分)Unity ※ 旧モデル旧 Ver.3 モデルの Unity package は別途公開しています(ダウンロードファイルにリンクあり)通常(制服)、Tシャツ姿、SD の3種類を新しく公開(Ver.3 モデル・2016/10/17 以降公開分)CLIP STUDIO & キャラミん OMP/Studio ※ 旧モデルCLIP STUDIO シリーズ向けは、同サービスのライセンス素材からダウンロードできます(FBX出力可)キャラミん OMP/Studio 向けは、同サービスのストアからダウンロードできます。作品紹介・hinoP さんの作品 → sm23810567niconico で利用作品を公開した場合、ぜひコンテンツツリーへ登録お願いします。
1. Use ASP/Character Shader
Set the current material's shader to ASP/Character.
Set ToonShadingStyle to CelShading (Face & StylizedPBR modes did not provide hair highlight options).
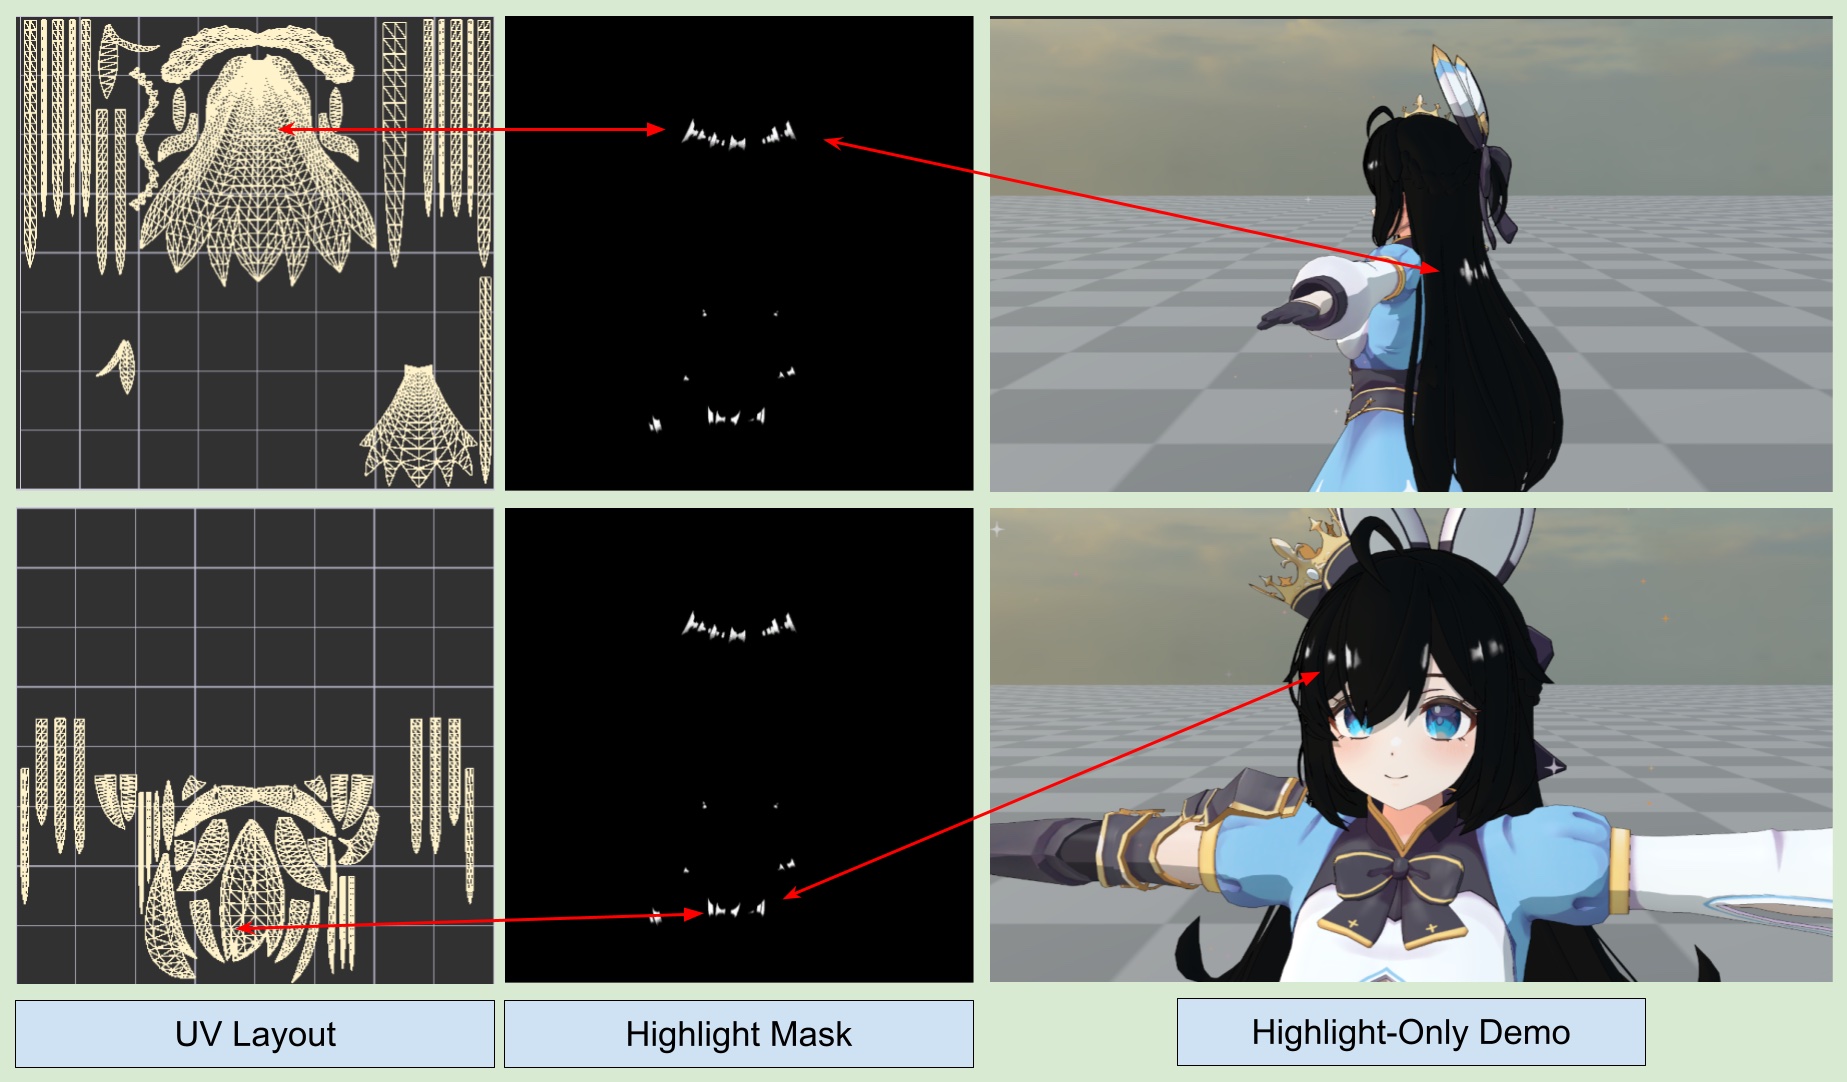
2. Prepare UV Unwrapped Hair Mesh and Texture
3. Setup Shader Parameters

In the Material Inspector, assign the Hair Highlight Mask texture created in the previous step.
Specify the UV for the sampling texture (default is UV2, ASP supports sampling from UV0 to UV3).
Setup the highlight color and Fresnel Mask Power. A smaller value restricts the highlight to the grazing angle, while a larger value increases the highlight area.
When Camera Roll Influence is greater than 0, the UV sampling shifts with the game's camera movement (the shift direction is along with mesh UV's Y axis).
Cut Offset From UV Sides is generally set to 0. Section 4 explains scenarios where it might be used.
Result
4. Alternative Hair Highlight UV Setup (Not Recommended)
Drawing the Highlight Mask directly on a UV unwrapped model texture using third-party DCC(Blender/Photoshop/Substance Painter) is the most intuitive for 3D artists but time-consuming (though it usually yields the best results).
Here’s a simpler UV setup method (not recommended), suitable for very simple highlight shapes (e.g., a horizontal line):
- In Blender or other software, create UVs in a new channel using the Project From View method.
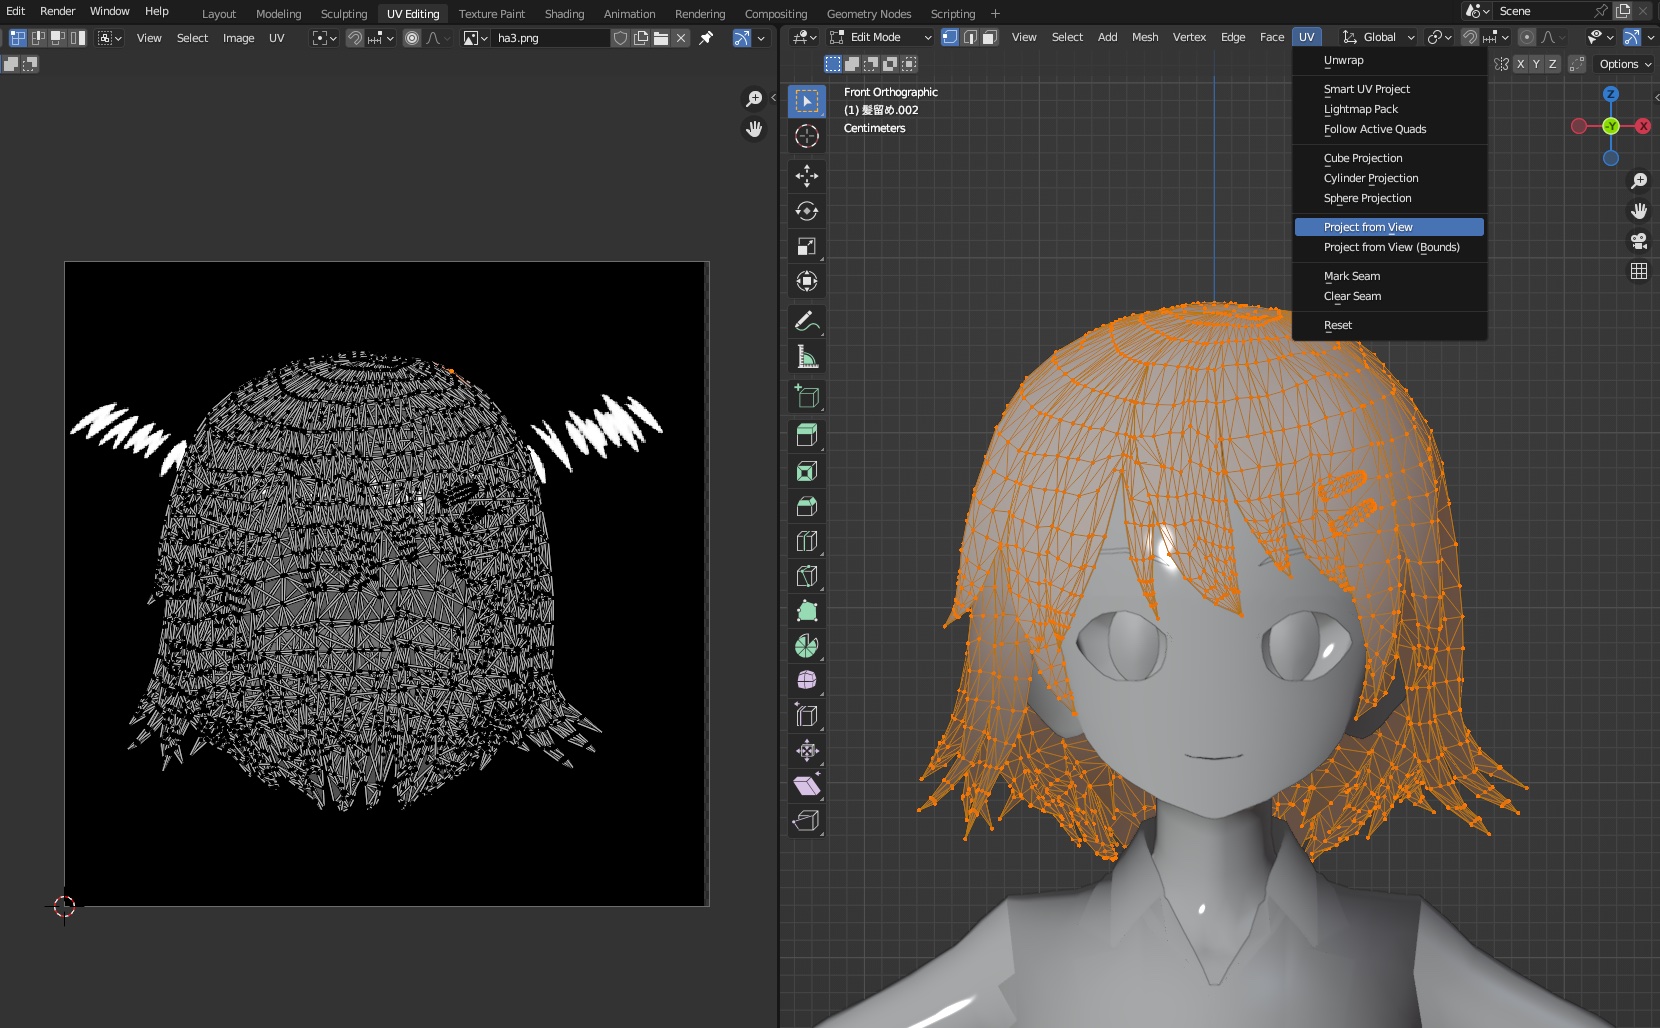
- When sampling the Highlight Mask, sample with the new UV channel created in the previous step.
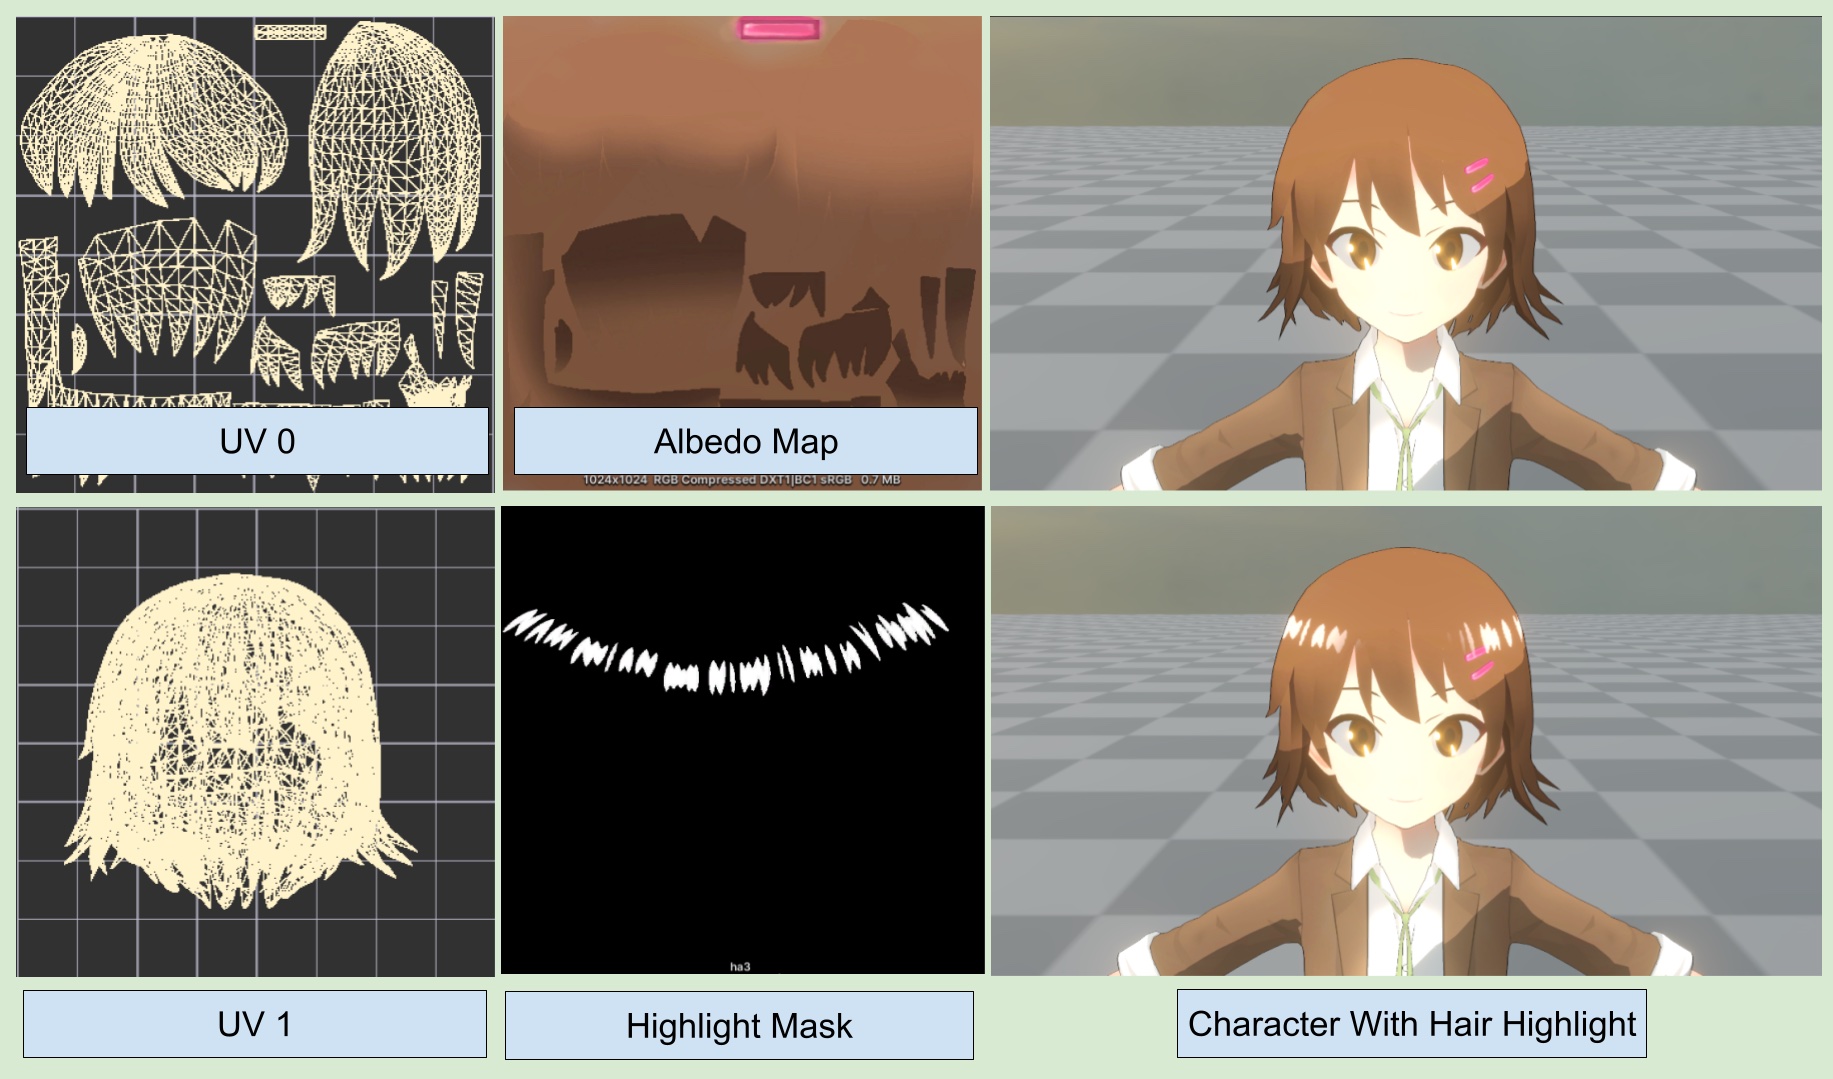
This method is simple to set up and quickly adds hair highlights to a character model. However, the highlights may appear merged at the model’s sides due to UV overlap.
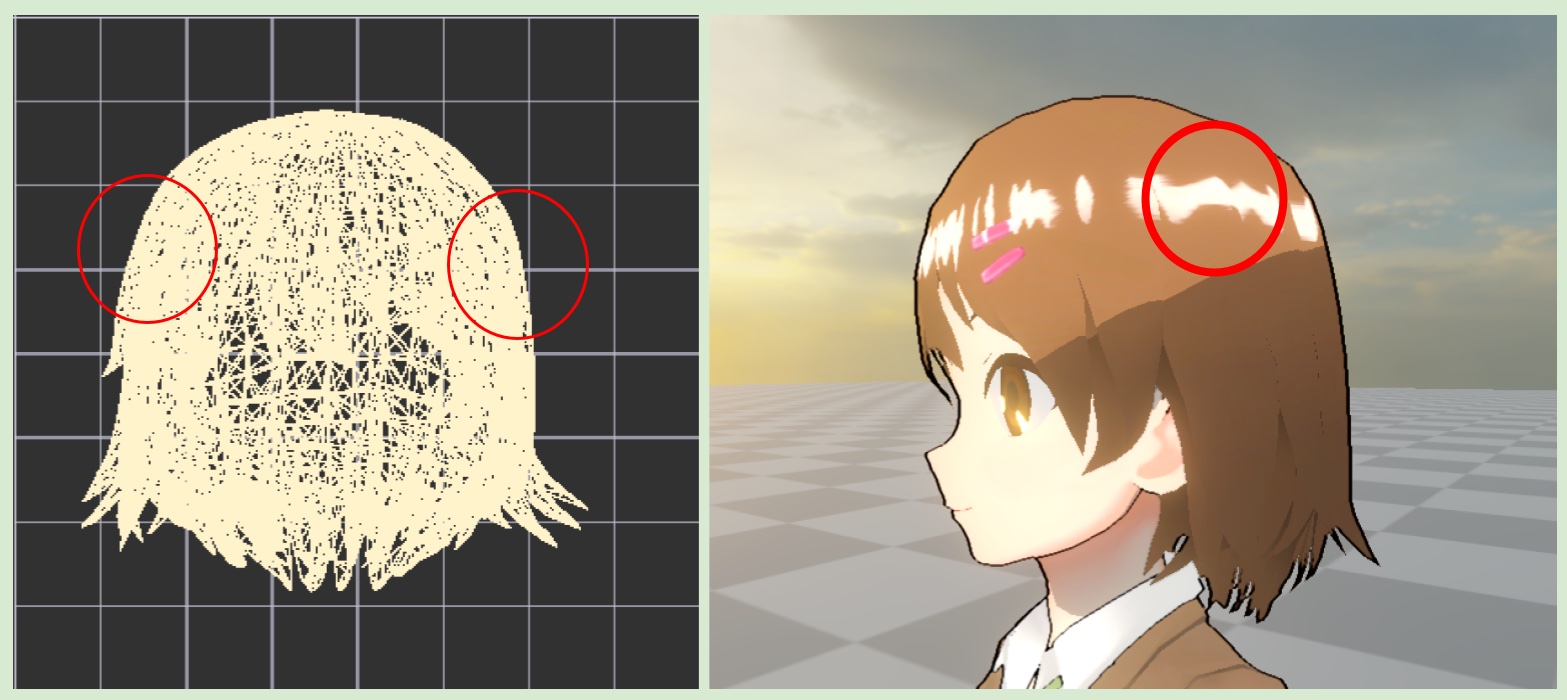
4.2. About Cut Offset From UV Sides
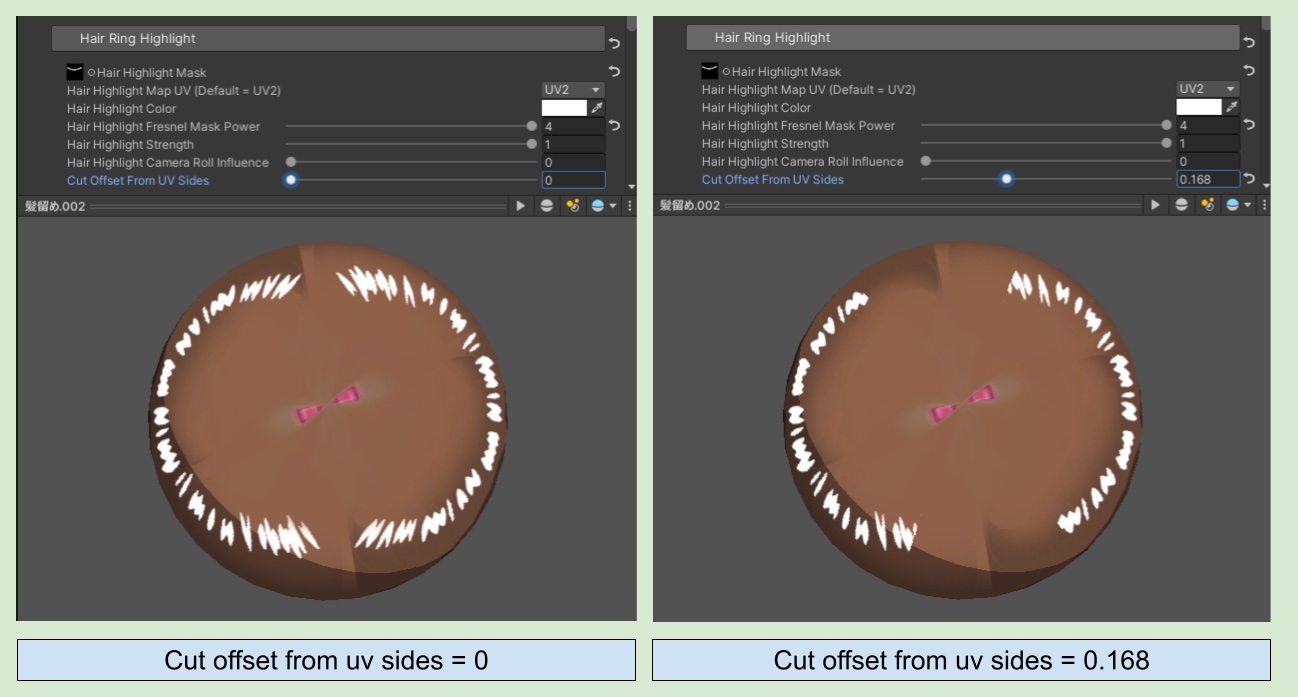
For UVs created using Project From View, highlight’s merging typically occurs at the UV channel's sides. Cut Offset From UV Sides trims the highlight effect from the both ends of X-axis - of the UV channel. Increase the value to remove more merged highlights from UV ‘s sides, until it’s enough to eliminate the issue.
💡 This UV setup method is only suitable for very simple shapes. For more complex highlight shapes, it’s recommended to manually unwrap the UV for the highlight texture.