.png)
Why write OpenGL?
One convenient thing about writing shaders in Unity’s Built-in Render Pipeline (BiRP) or URP is the large number of macros, built-in functions, and variables available. They let users ignore many implementation details. For example, converting a 3D coordinate between coordinate systems in URP usually means calling a TransformNNNToMMM function; direction vectors have TransformNNNToMMMDDir, and calculating screen coordinates only requires a built-in function such as ComputeScreenPos. This is very convenient, but because of these conveniences I never fully understood the calculations happening underneath.
To clarify many small details, I wanted to go back and study OpenGL. For me, that felt like the most practical approach. I am following the LearnOpenGL website to write a renderer; while reading shojo manga, I have reached Shadow Maps + CSM. I have not written any flashy effects yet, and COVID interrupted me for a week, but I have still learned a lot. This post records the parts that were unclear to me when writing Unity shaders and the lessons from the process.
Getting Started
Environment
The project is in C++. Setting up the environment took a little time but caused no major problems. I had simply not touched C++ or Visual Studio for a long time. As long as CMake builds the required libraries, the rest is just putting files in the right places and configuring the linker.
If you are unfamiliar with C++ syntax, see The Cherno’s C++ series on YouTube.
Everything in the Getting Started chapter before Coordinate Systems was straightforward. The main points are coordinate systems and implementing a camera.
Coordinate systems
The life of a coordinate
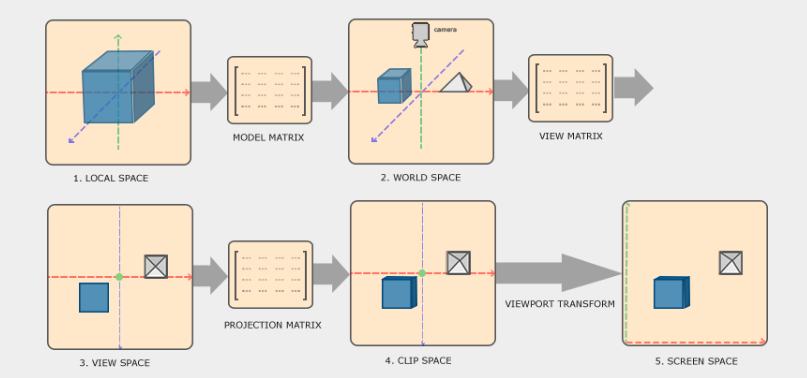
This section explains how a 3D coordinate is transformed through the rendering pipeline from object space into pixels on the screen.
Vertex Shader: model-space coordinate → multiply by the Model matrix → world-space coordinate → multiply by the View matrix → view (camera) space coordinate → multiply by the Projection matrix → clip-space coordinate → the Vertex Shader outputs gl_Position and enters the viewport-transform stage.
(
gl_Positionis the vertex coordinate in clip space. In a Unity custom shader, it corresponds to the_TransformObjectToHClip(v.vertex)we use regularly.)
Viewport transform: divide the clip-space coordinate by gl_Position.w (perspective divide) to obtain NDC coordinates, then convert NDC to screen space.
Pixel Shader: color each pixel in screen space.
I had always been a little unclear about the difference between NDC and clip-space coordinates. NDC is the result of performing the perspective divide on gl_Position during the viewport transform. With orthographic projection there is no perspective effect (objects do not get smaller with distance), so gl_Position.w is 1 and NDC equals the clip-space coordinate.
Camera
The most notable part of the camera section is implementing a custom LookAt matrix instead of using GLM’s built-in LookAt. I will be lazy and show the diagram.
.png)
In short, make a matrix from three mutually perpendicular vectors (right, up, and front), then multiply it by the translation matrix of the current coordinate. This transfers the coordinate into any desired space. It is extremely useful, so commit it to memory. We will apply the same idea directly when implementing shadow maps.
Lighting
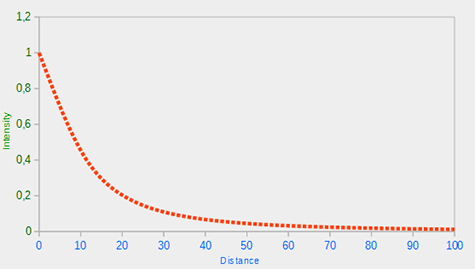
The Unity CG/HLSL portion of this chapter transferred almost seamlessly. I implemented a lighting model according to my own preferences. The notable part was implementing attenuation functions for point and spot lights; when writing Unity shaders, the light attenuation is already calculated for us, so there is rarely an opportunity to implement it. It was a good exercise.
Model Loading
This chapter demonstrates loading 3D model files with the Assimp library and setting up the VBO and VAO during import. It unexpectedly took a great deal of time. When loading .obj and .fbx files, for example, FBX requires consideration of parent-child relationships in the model skeleton, while OBJ does not. I also implemented automatic lookup of textures in a folder based on the material name. The texture types include albedo, normal, and specular maps, and even deciding the naming rules for automatically loading them took a lot of time.
At one point I could not find the matching texture and passed an invalid ID to glBindTexture, which broke everything that used the texture afterward.
OpenGL also lets us choose how mesh data is laid out in the GL_ARRAY_BUFFER associated with a VBO. Each vertex can be interleaved as position/normal/uv | position/normal/uv | position/normal/uv, or grouped as position/position/position | normal/normal/normal | uv/uv/uv. I implemented the latter.
Advanced OpenGL
This chapter implements many commands commonly seen in Unity ShaderLab: transparent blending, the stencil buffer, depth testing, culling, and so on.
It involves many questions about rendering order, such as drawing transparent objects last, depth testing when drawing the skybox, and sorting transparent objects in a scene. If you have written a Renderer Feature in URP or implemented a custom SRP, this section is fairly easy to understand.
.png)
Framebuffer object
Besides the commands and transparency blending above, the most important exercise in this chapter is the FBO. After binding a specified framebuffer object and its textures, we can render the scene into that FBO. The Unity equivalent is an RTHandle or RenderTexture. The concept is easy to understand, but because I was unfamiliar with OpenGL syntax, I spent a lot of time experimenting. XD
Cubemaps—OpenGL is upside down
This chapter also implements environment reflections with cubemaps. At first something felt wrong: OpenGL cubemaps were upside down on my computer. Unity shader macros handle many details like this for us, which is a luxury.
Advanced Lighting
Blinn-Phong
The first section introduces Blinn-Phong. The tutorial initially implements the Phong model, but I wrote Blinn-Phong from the start, so I skipped that part.
Gamma correction
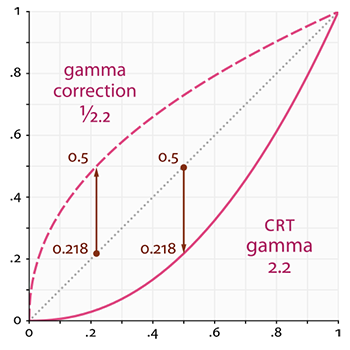
I went back over this section many times. Here is my current understanding of gamma correction:
- When a computer monitor outputs an image, it automatically converts the image to gamma-space colors (the gamma curve in the image above), which makes it darker. In gamma space, the colors we see with our eyes do not correspond directly to linear-space values; the half-black color we see on the monitor is not 0.5 in linear space.
- Lighting and color calculations in shaders, especially physically based lighting, are performed in linear space. 0 is completely black, 0.5 is numerically half black, and 1 is white.
- Artists create textures through a monitor so that the colors look correct to the eye. Because they are made through a monitor, these colors are in gamma space. Feeding such textures directly into shader calculations is wrong; they must first be converted to sRGB so that the sampled shader values are linear.
- Program-generated textures such as normal maps and height maps are not created through the monitor-to-eye process. They are already in linear space and do not need special conversion to sRGB.
- Whether to enable sRGB in Unity’s import settings follows from points 3 and 4.
- Shader calculations happen in linear space, while the screen automatically applies a gamma curve to the final output. Applying gamma correction to the shader result before output (the magenta dashed curve in the image above) cancels the monitor’s gamma curve and displays the intended linear values.
Shadows
Implementing shadows requires FBOs and matrix operations. Render the scene’s depth once from the light’s position; this depth image is the shadow map. Pass the light-space P × V matrix to the shader. When rendering an object, multiply its world position by the light-space VP matrix to obtain shadow coordinates. Sampling the shadow map with those coordinates gives the pixel’s depth in light space; compare it with the current depth to determine whether the pixel is in shadow.
The Coordinate Systems section taught us that a LookAt matrix can transfer any coordinate into a specified space. Therefore, a LookAt matrix oriented along a directional light gives the light-space V matrix. Use an orthographic projection for P. Its size can be chosen freely; because I later implemented CSM, I calculated every corner of the view frustum and used those corners to determine the orthographic size.
Cascaded Shadow Mapping
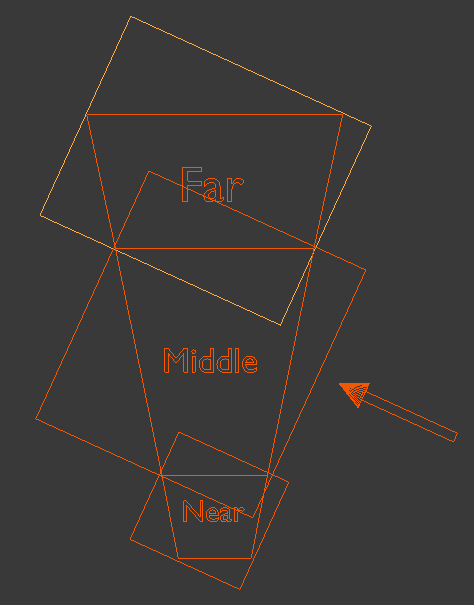
Since I planned to implement CSM in Unity later, I decided to try it in OpenGL first. The LearnOpenGL tutorial uses a Geometry Shader to render different layers of the shadow map. I used multiple FBOs and a GL_TEXTURE_2D_ARRAY; in the render loop, the cascade index selects the corresponding FBO and the depth is drawn into the corresponding layer of the 2D array.
Because I was unfamiliar with OpenGL syntax, I fell into many traps. For example, the first argument to glGenFramebuffers must match the number of cascade layers, and binding a specified layer of a 2D array to an FBO requires glFramebufferTextureLayer. I eventually pieced it all together, which was a happy ending.
.png)
That is the current extent of my OpenGL practice. The remaining large tasks are deferred rendering and implementing PBR. I will post my thoughts after organizing them.