Introduction
This post records how I used the Memoria mod for Final Fantasy 9 (FF9) to modify the shaders used by the game, giving its characters and scenes a completely different feel. It covers my analysis of FF9’s shaders and the process and ideas behind introducing per-pixel lighting into a game constrained by low model polygon counts and limited real-time lighting methods.
I first played FF9 at home when I was eight years old, and it eventually became the reason I entered the game industry. I am now happily replaying FF9 with my own mod. This time I hope to collect every weapon and achievement except Excalibur II.
Comparing the original and modified images
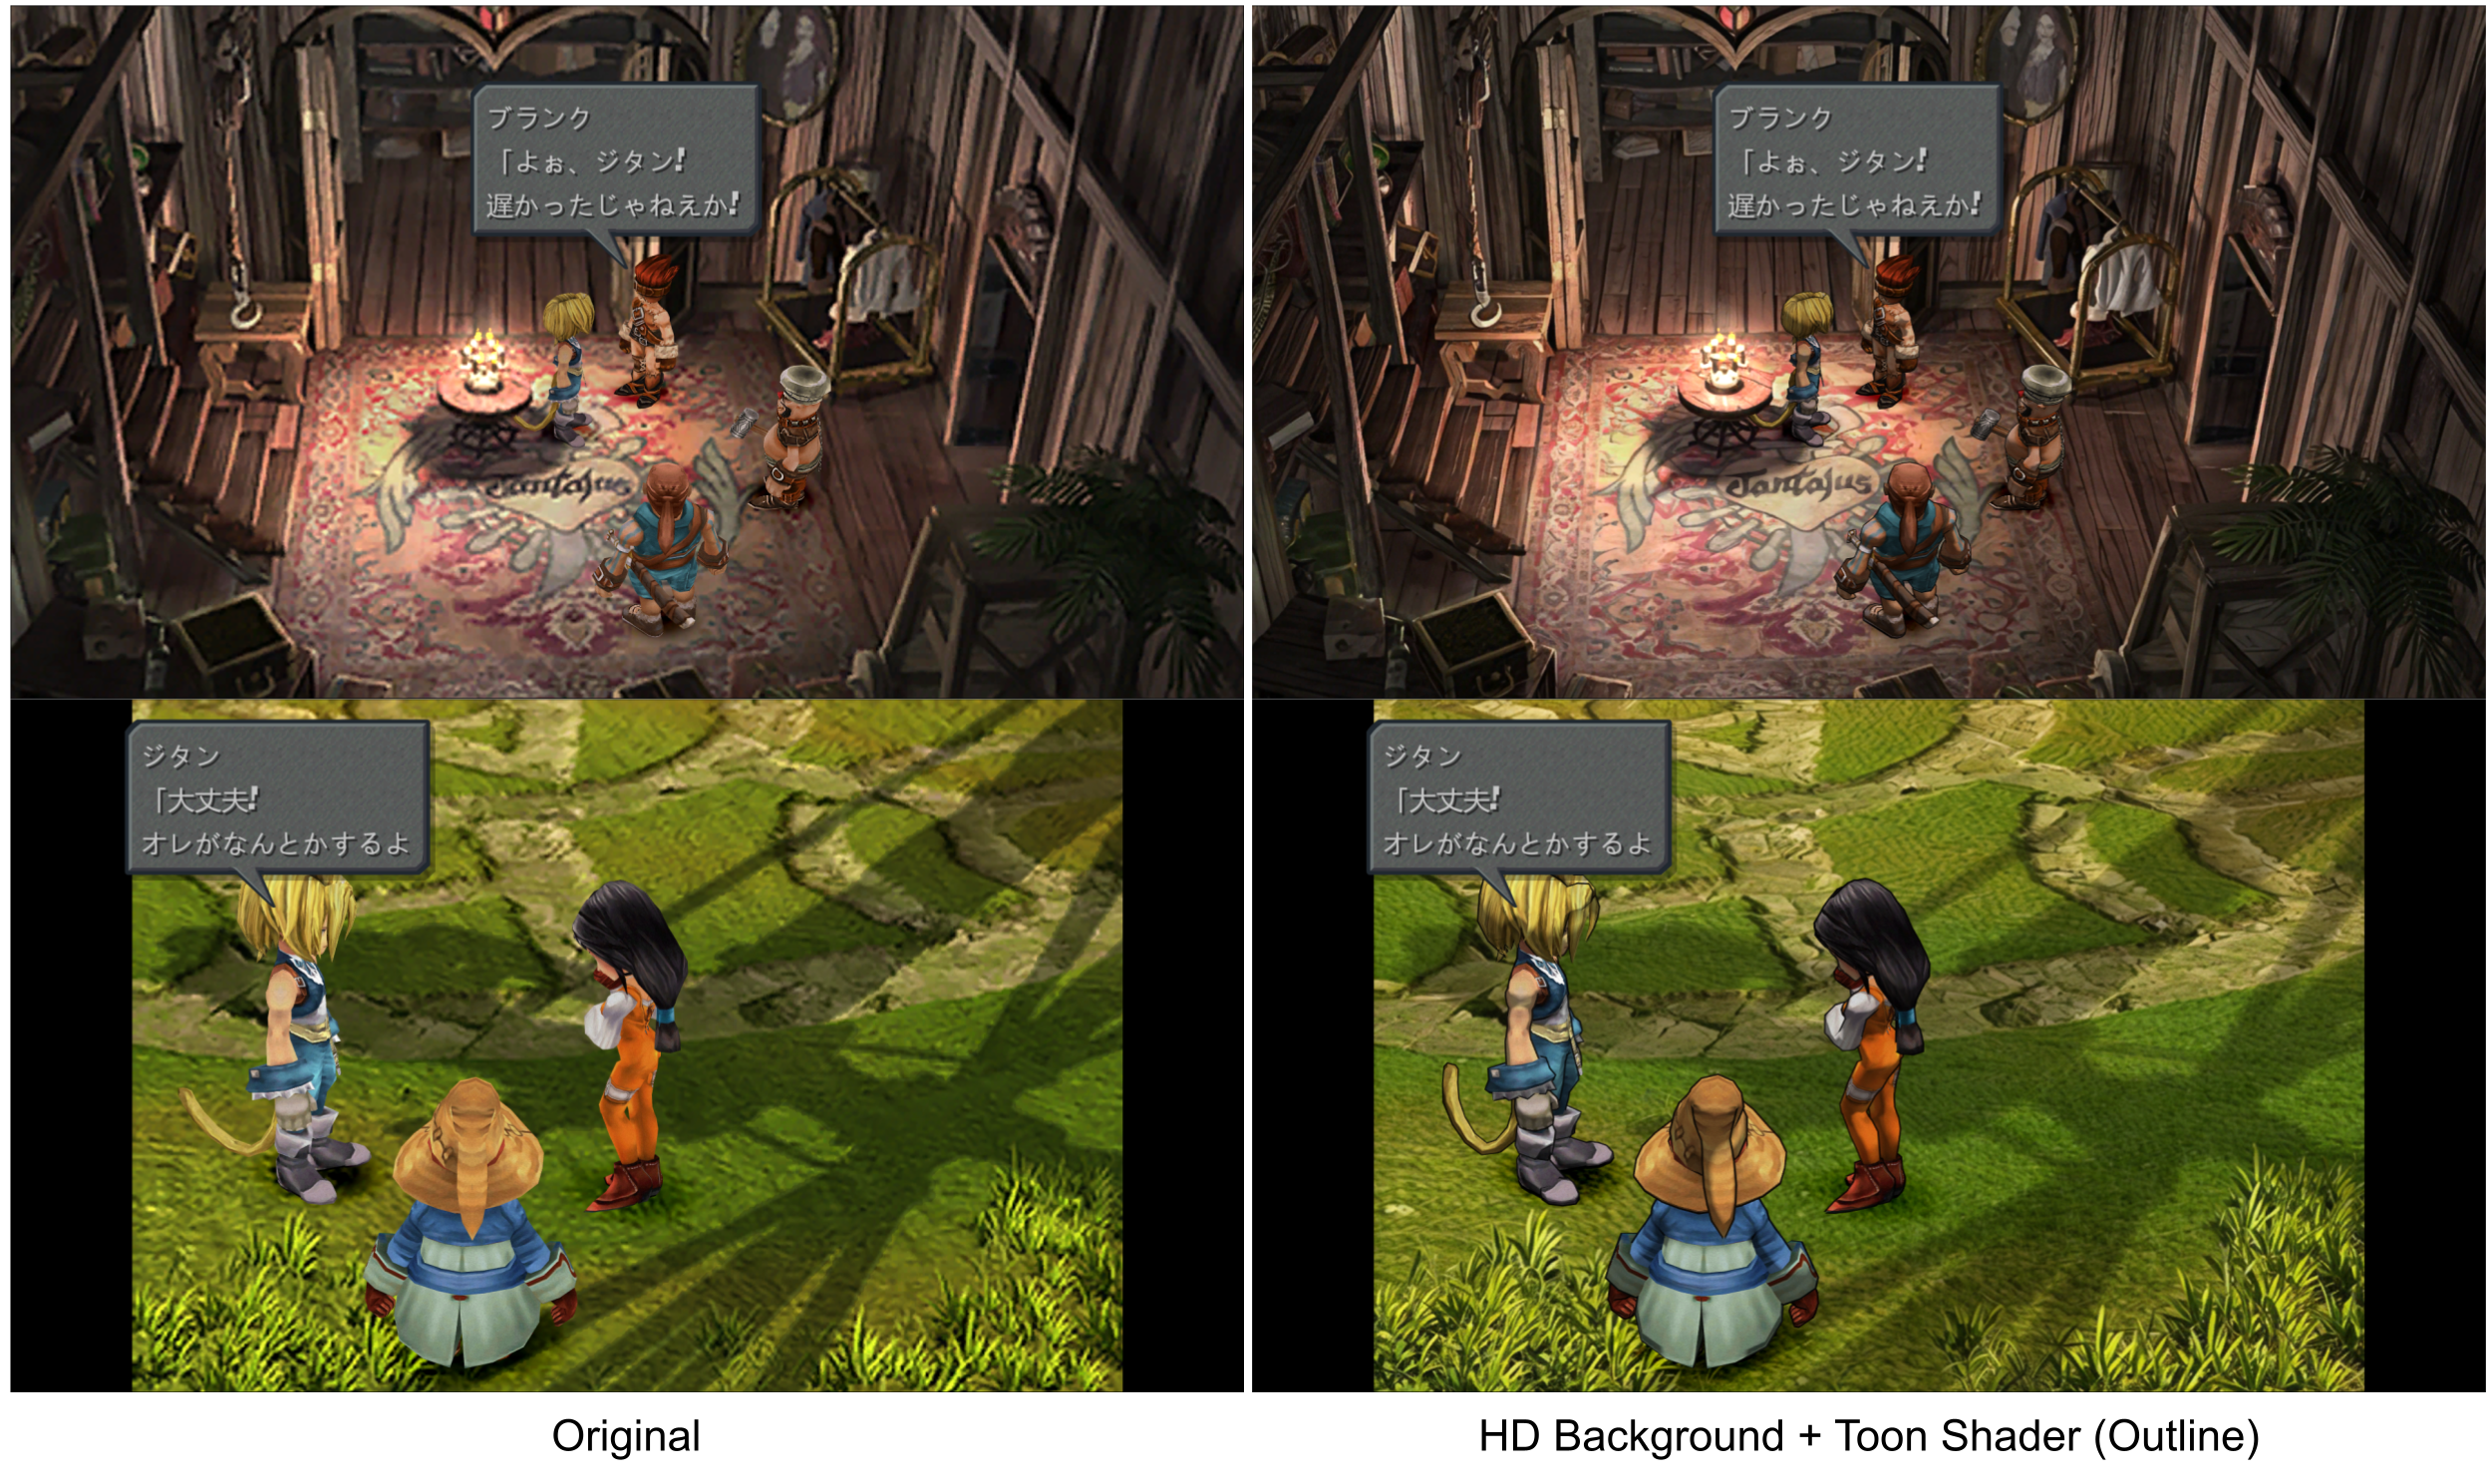
First, compare the 2016 PC port with the version using the Memoria mod and new shaders.
Outside combat, characters use toon rendering and outlines, while the background uses AI-upscaled images from the Moguri mod.
In the fully 3D battle scenes, enemies and the player’s party use the Blinn-Phong lighting model. A corresponding skybox is generated for each environment to calculate ambient light, and the background shader has been updated with more lively cloud effects.
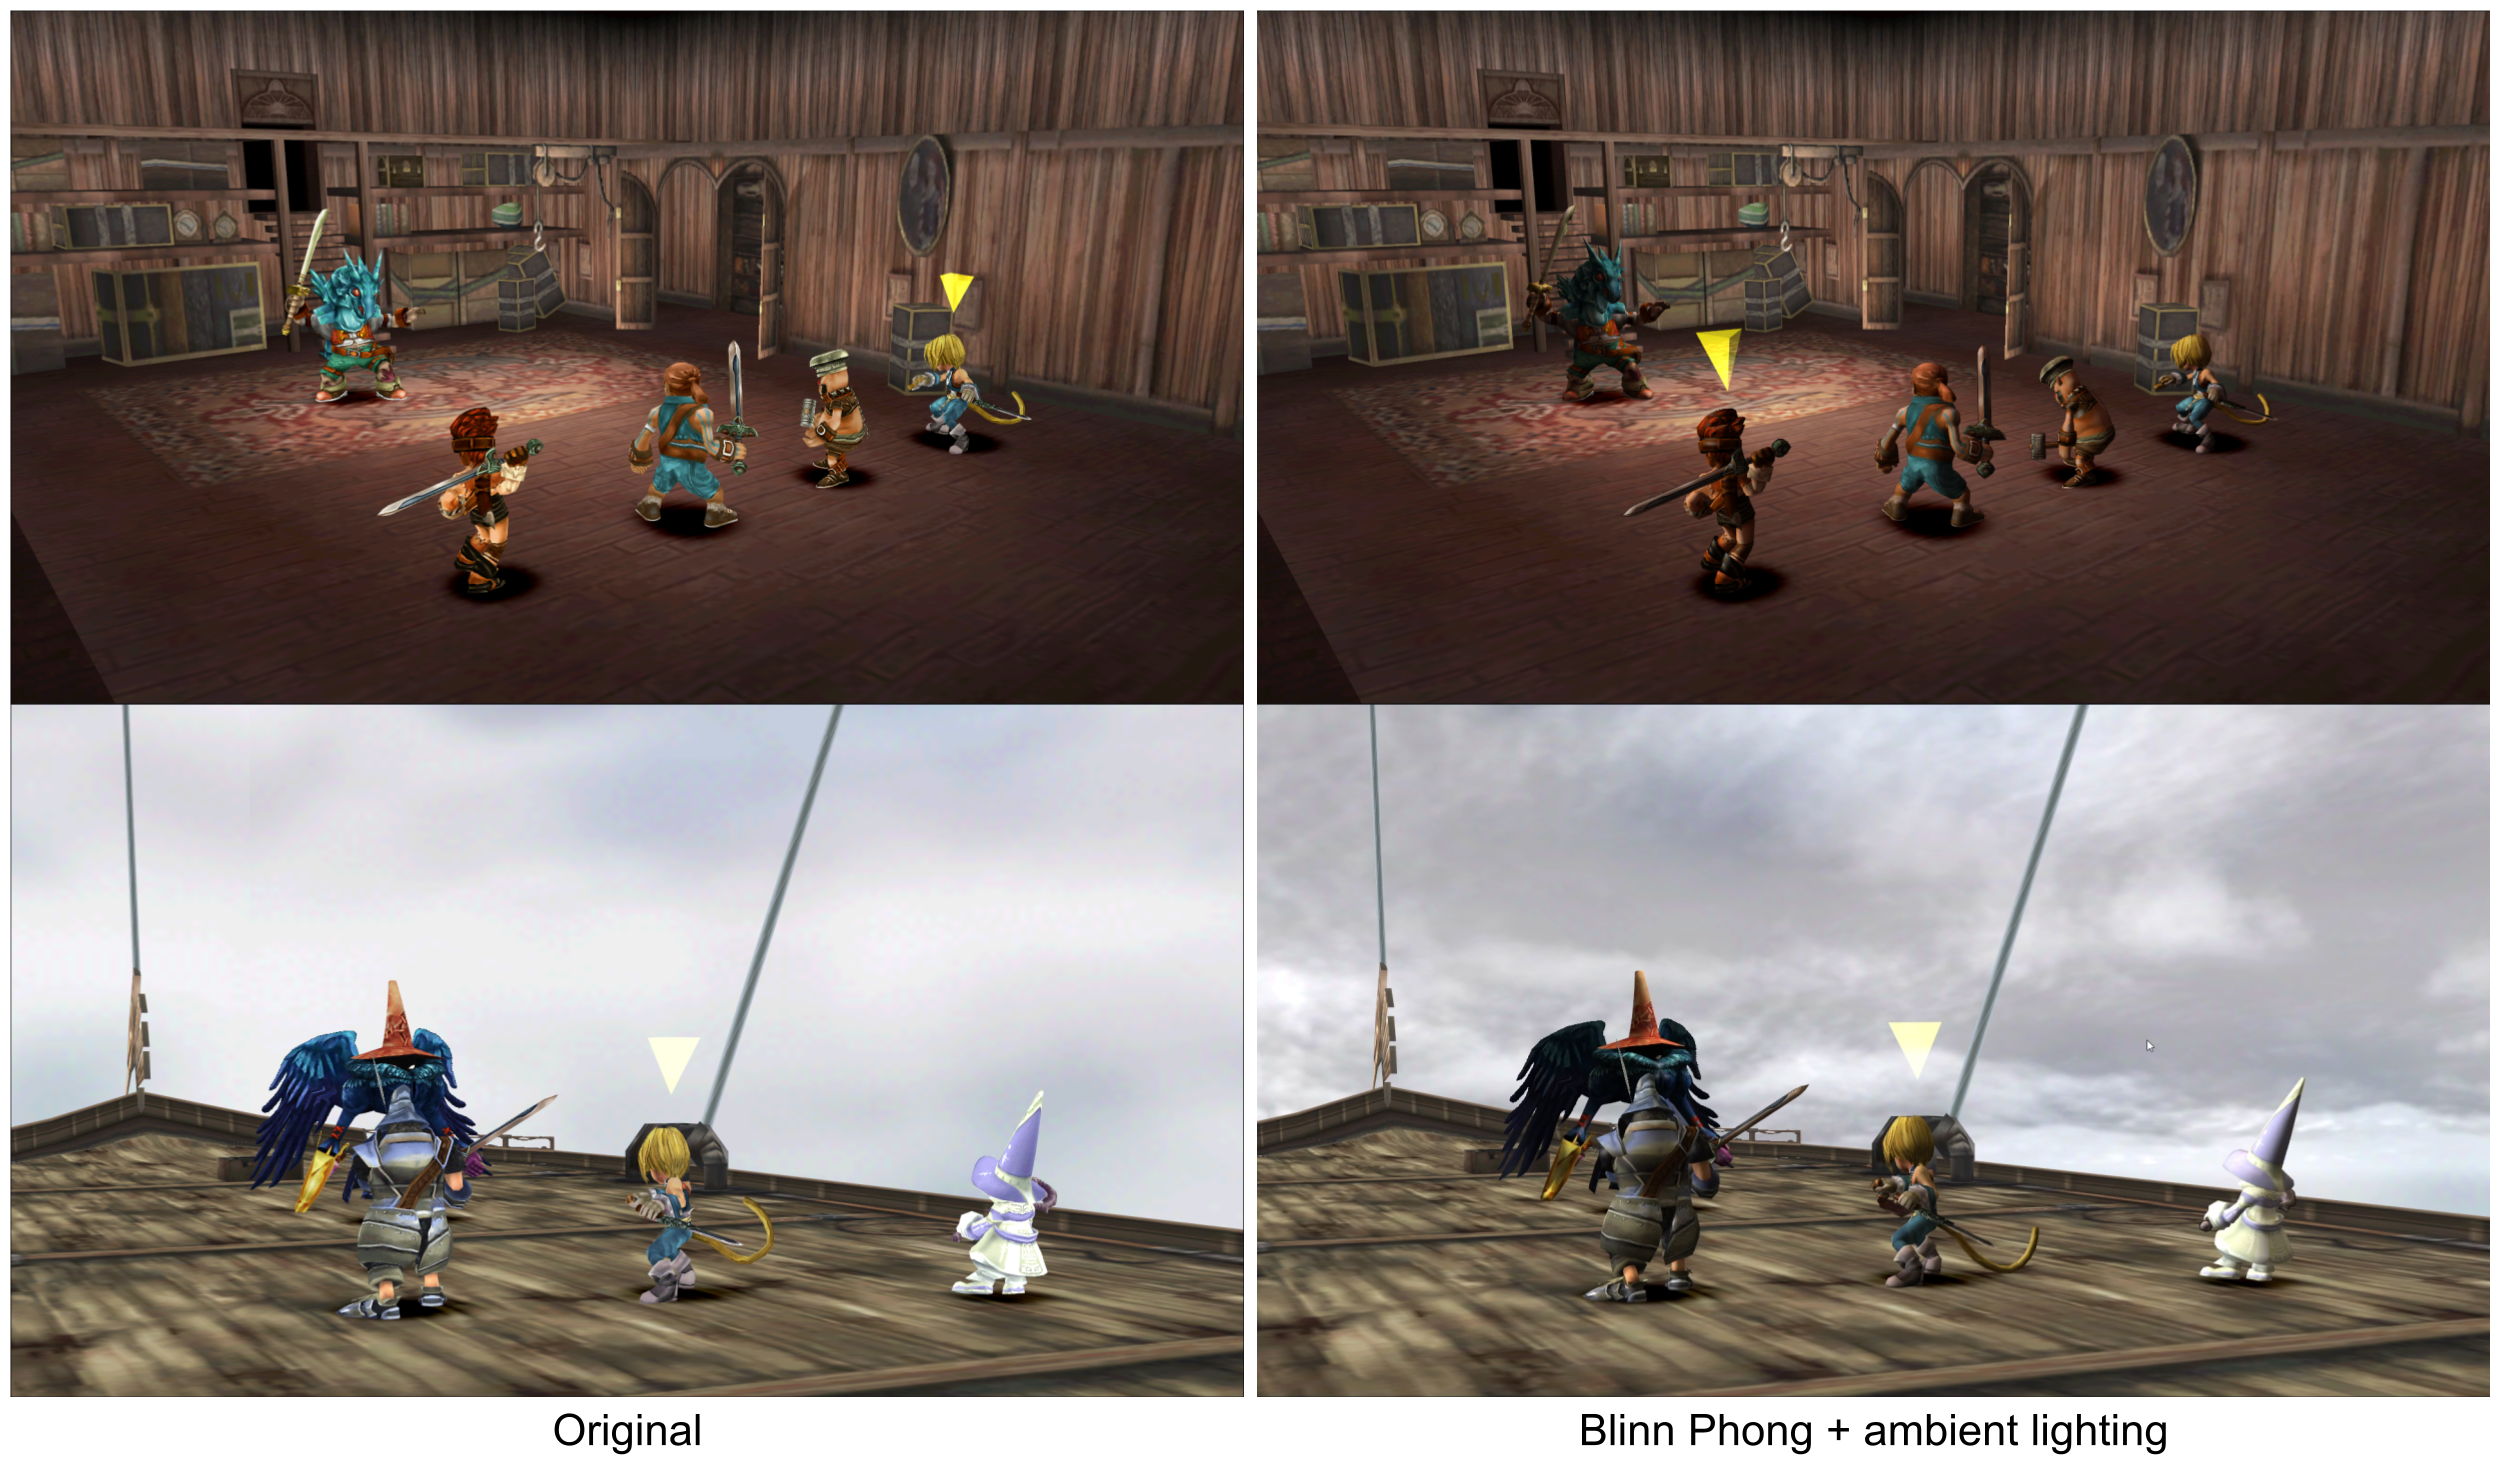
Pixel shaders did not exist during the PS1 era, so most games used only textures (or vertex lighting). FF9 is the same: changes in brightness on the characters are painted directly into the textures, making the result look flat. Per-pixel lighting emphasizes the three-dimensional form. Whether to use toon shading or Blinn-Phong is a personal preference; my mod lets both combat and non-combat shaders switch between the two styles.
The FF9 PC version, mods, and the current state
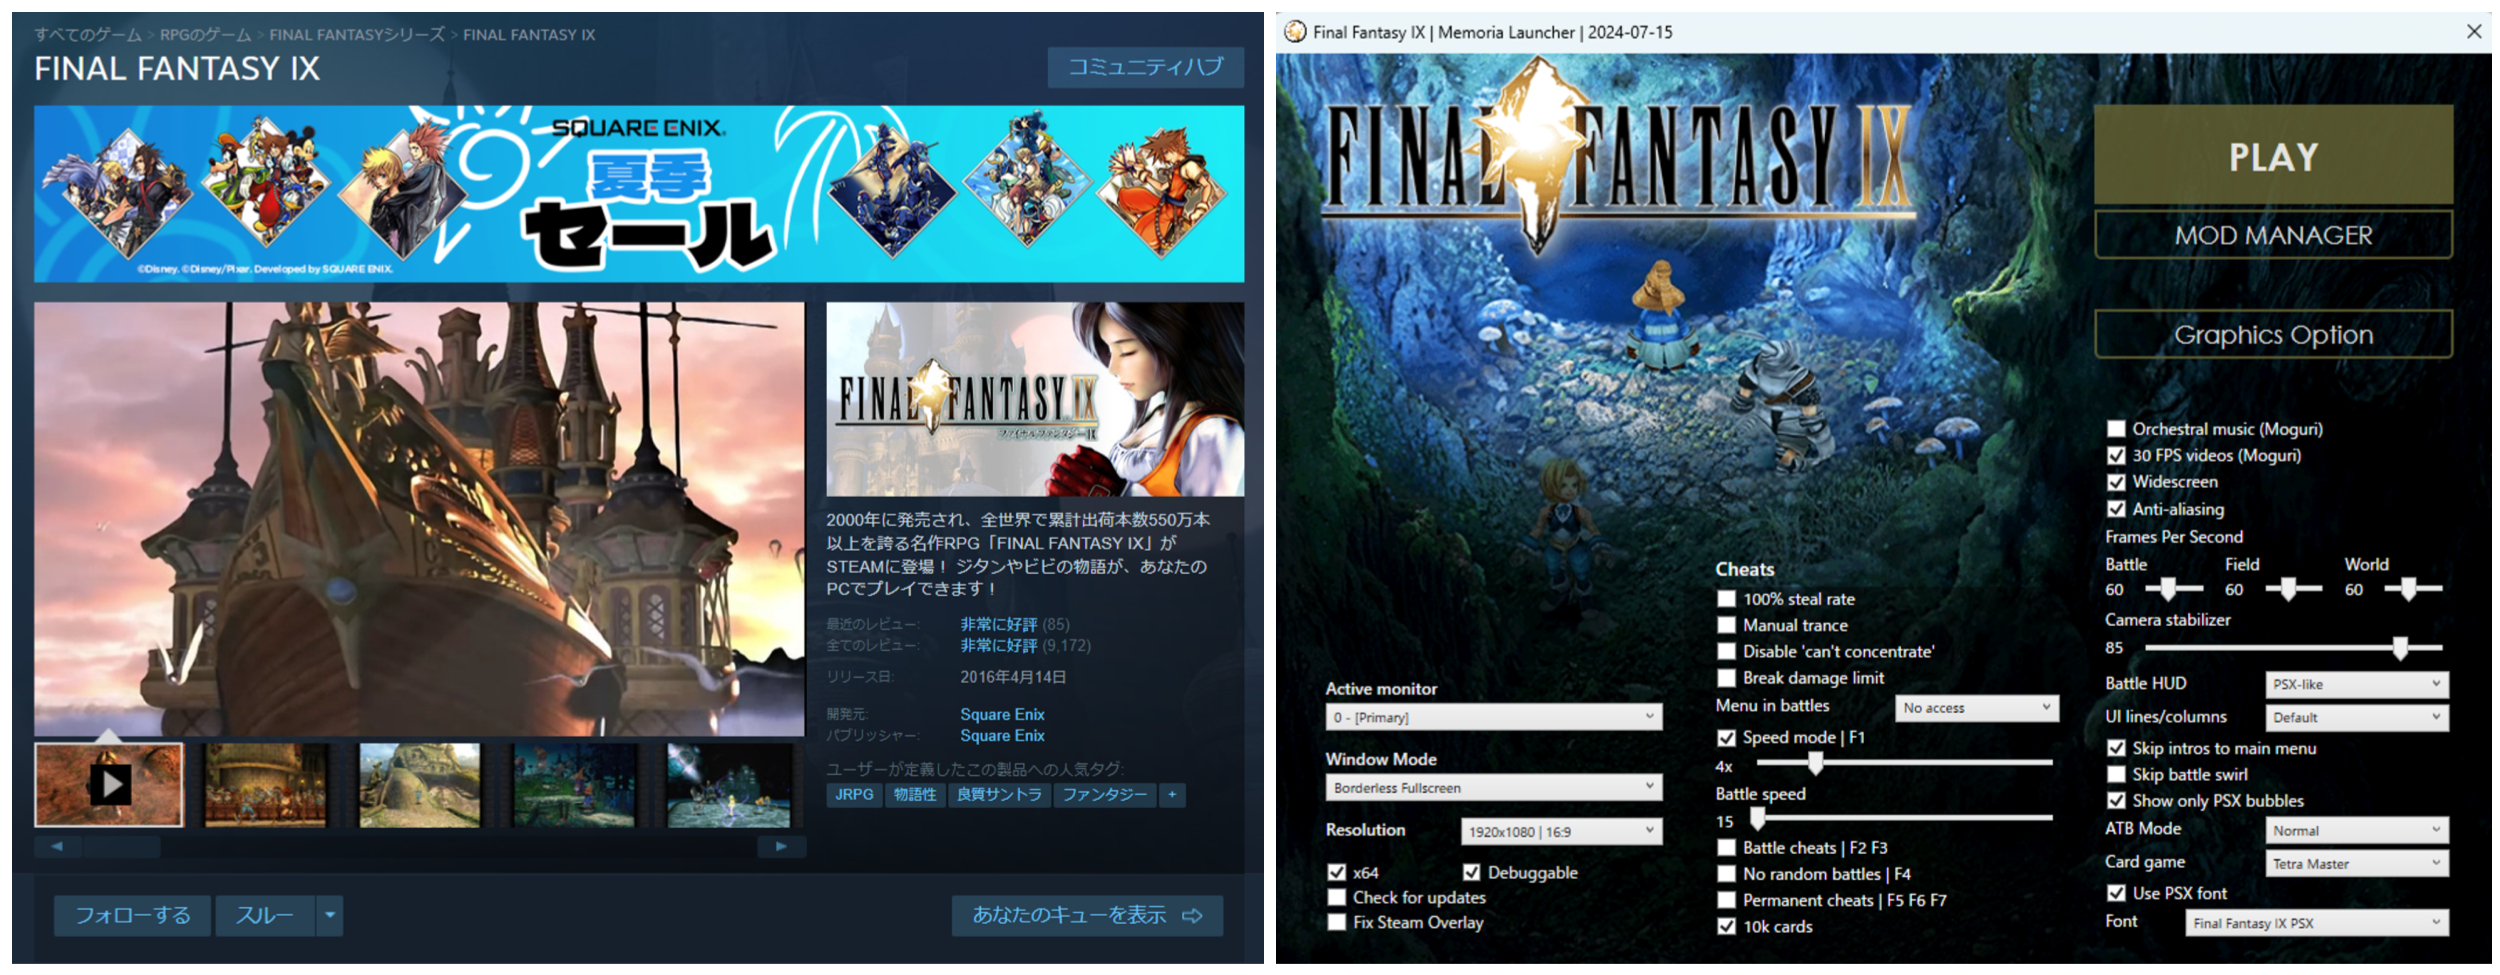
FF9 was first released for the PS1 in 1999 (how nostalgic). The PC version arrived on Steam in 2016. It was made with Unity, but not all game logic was rewritten in Unity; a large part still runs through code from the old engine. Magic-particle effects, camera movement, and the projection matrix used during rendering are examples. Using Unity for the port nevertheless opened the door for the community to mod it.
The Memoria project is a mod that can completely replace the C# logic of the FF9 PC version. Based on Memoria, the community has added many features. The most widely used is the Moguri Mod, which replaces all game backgrounds with AI-upscaled and hand-painted images. Memoria has also recently enabled people to increase character animation from 15 FPS on the PS1/PC version to as high as 120 FPS. Other mods increase the difficulty or add new playable characters.
These mods greatly improve the playing experience, but the visuals are still limited, like most old-game mods, to replacing textures.
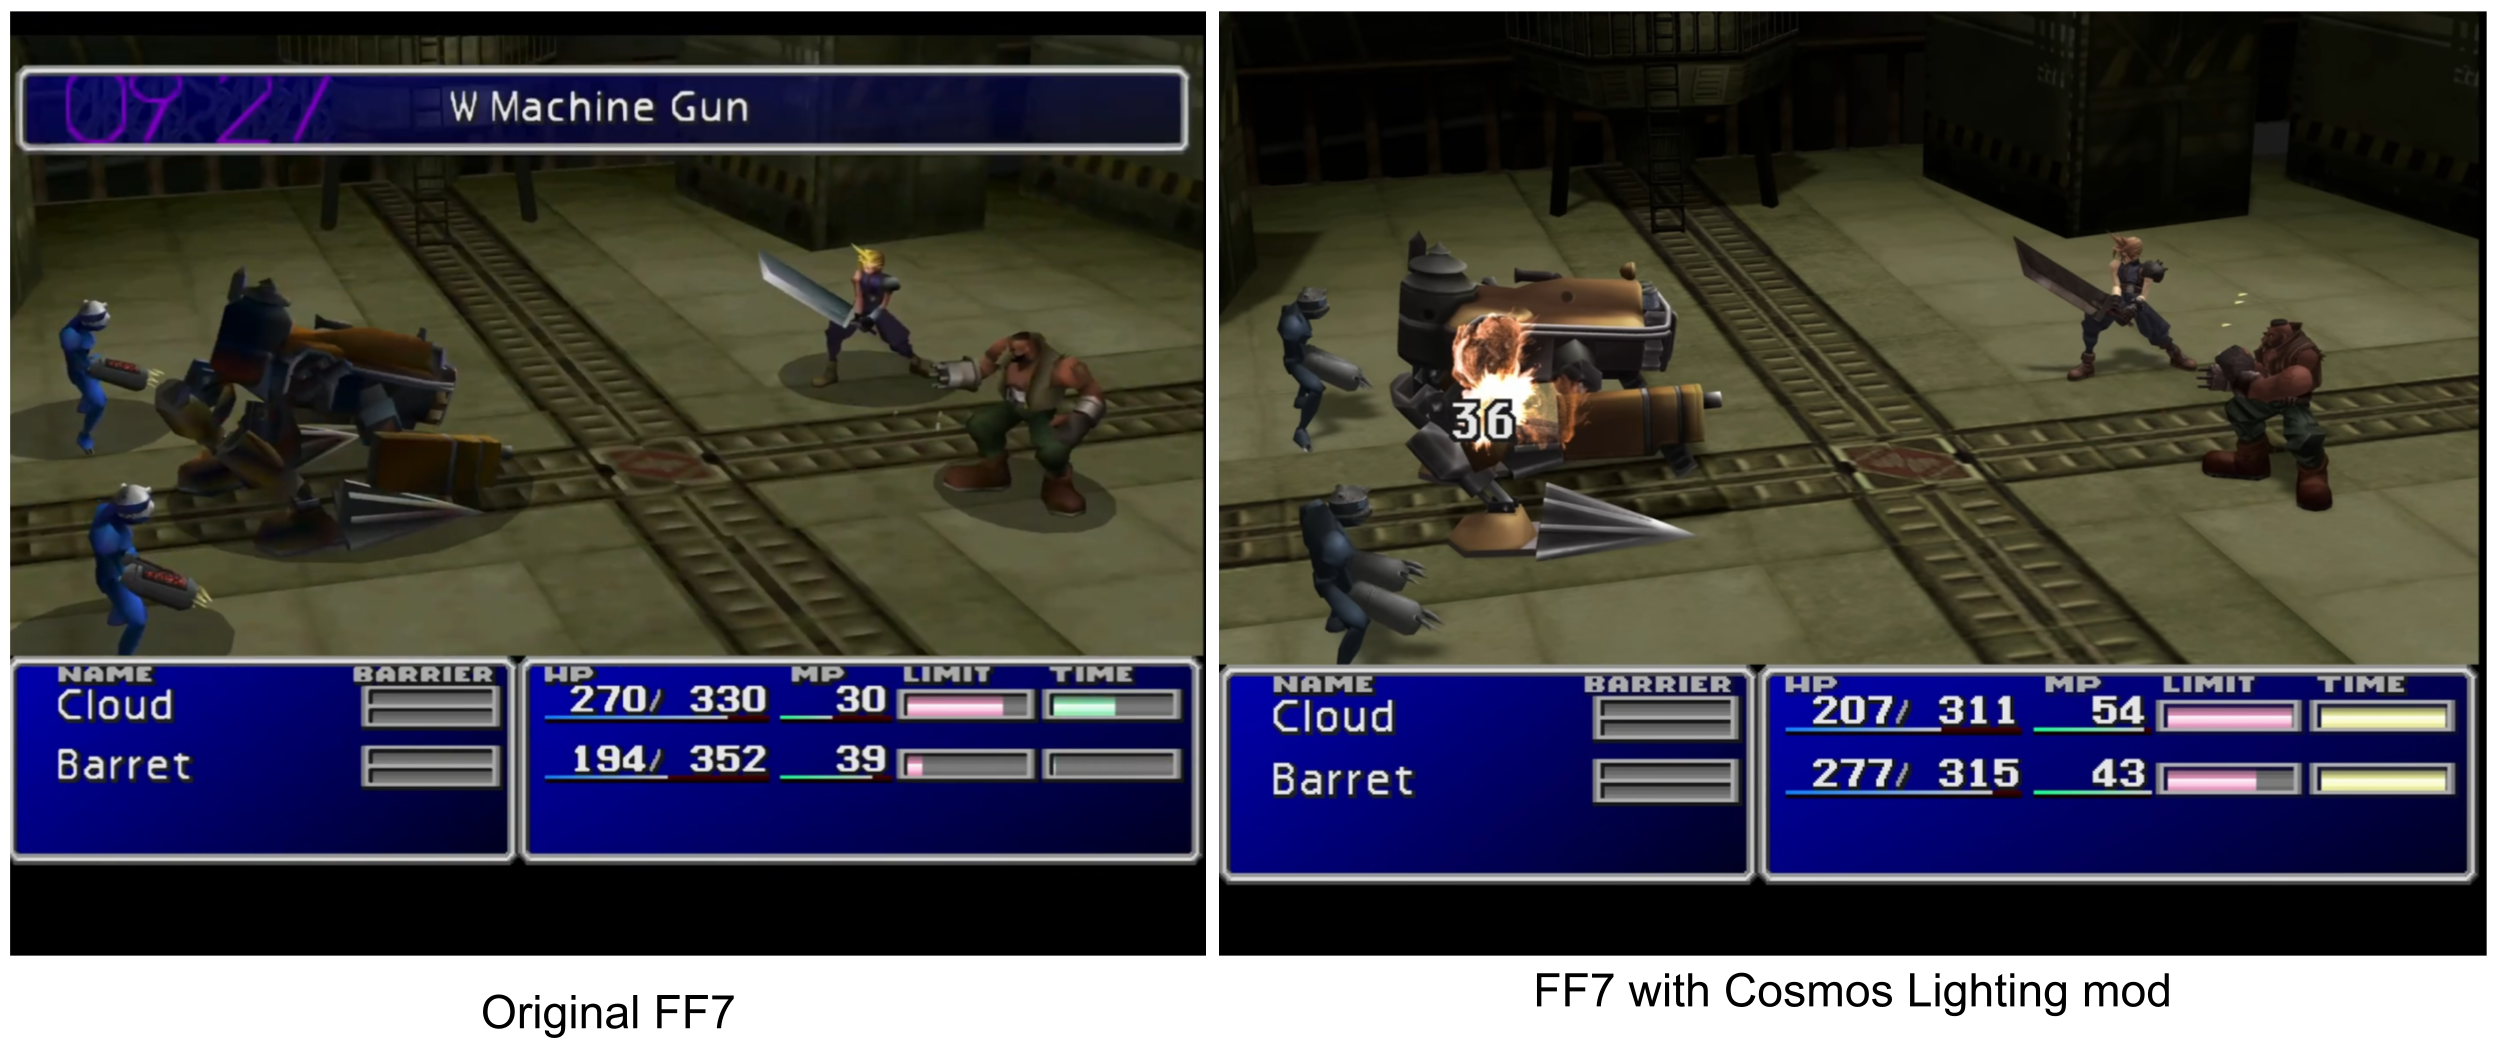
After replaying FF7 and installing the lighting mod Cosmos Lighting, I began thinking about modifying the shaders used by FF9.
Wait—you can modify the shaders in a game!?
The answer is yes, but it is more hardcore than writing an ordinary shader.
First, review how Unity compiles and uses shaders.
In plain language, a Unity shader’s life from creation to use in a game is roughly:
- Write a shader in the Unity Editor with a node editor or HLSL.
- Build the game; the Shader Compiler compiles the shader file into shader assets for different target platforms.
- At runtime, load the shader asset and send its shader assembly to the GPU driver. The driver compiles the assembly once more and caches the resulting program so it is not compiled again the next time it is used.
If step 3 takes too long while playing a game, it causes the infamous shader stutter. New releases often feel choppy the first time they are played but become smooth on a second run because the GPU driver no longer needs to compile the huge number of shaders.
When FF9 runs through Memoria, it reads the required shader assets (a huge string) from a specified path and then performs step 3 above. A mod cannot rebuild the entire project, but it can modify the shader-asset strings that are loaded to add the desired features. As long as there are no compilation errors, the GPU driver can compile and run the shader.
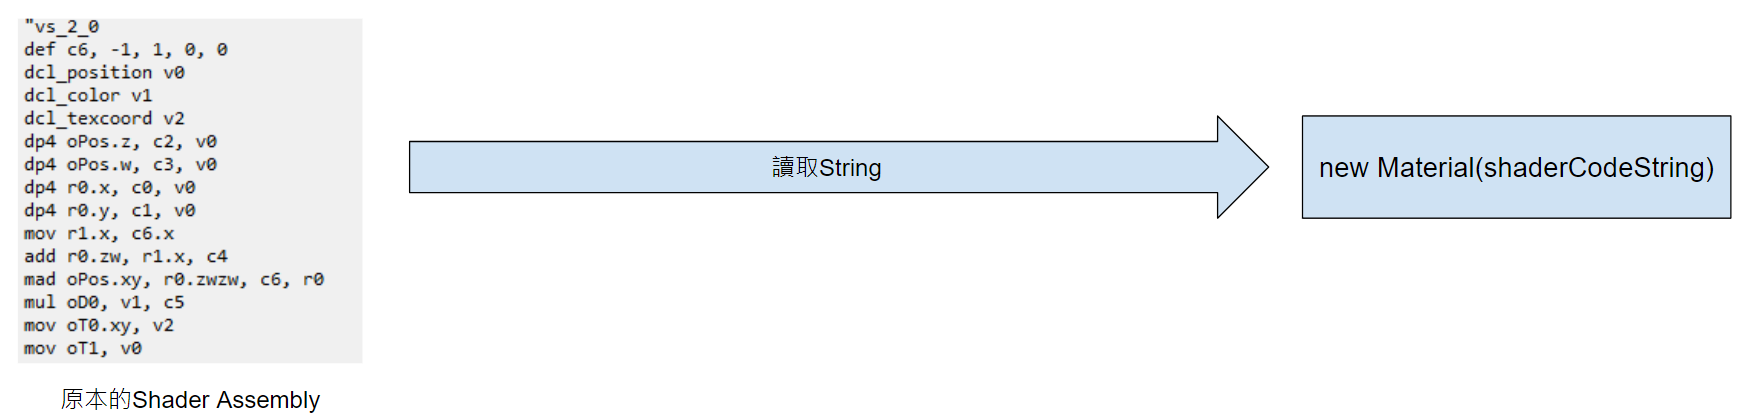
What information does an in-game shader asset provide?
Although the FF9 port does not rewrite the entire game in C#, rendering is completely handled by Unity. The game still looks like the old PS1 title, but every shader behind it was rewritten in Unity.
This means:
- Unity shaders include a Pixel Shader stage, so we can color 3D objects per pixel.
- Third-party tools can export game assets, including shaders stored as text files.
Using Unity’s built-in UI shader as an example, the shader file in the game folder looks like this (partially):
This shader asset is not very different from a shader we write in Unity. It contains the Tags, Pass, Properties, and other data Unity shaders require, plus Program "vp" and "fp", the vertex-shader and fragment-shader (or pixel-shader) programs.
The first line under program vp, d3d9, means the target platform is DX9—very old. FF9 therefore cannot support more elaborate shaders such as compute shaders or other features that require DX11. vs_2_0 means the file was compiled with Shader Model 2.0. Compared with later versions, vs_2_0 supports fewer instructions, limiting the amount of functionality that can fit in a shader, although older versions support more hardware.
The most obvious difference from an ordinary Unity shader is the shader-program code itself. Here the shader code has been compiled into assembly rather than the HLSL/CG syntax we normally write. This is the part I modify to add custom shader logic (along with adding or modifying the corresponding variables and variable indices).
Limitations of modifying FF9
Before modifying a shader, list the limitations of modding FF9:
- 3D models and animations cannot be replaced because the models used by the game were serialized in Unity.
- Existing textures can be replaced, and new textures can be loaded into a shader.
- Existing shaders can be changed and new shaders can be added, but the logic and variables currently used by the game must be preserved; otherwise the result will usually break when displayed.
- Most models and textures are from the PS1 era, with low polygon counts and small 256×256 textures.
- C# code can be added or modified, but only the Unity 5.2 API is available. This is the limitation I find most uncomfortable.
From assembly to a Unity shader implementation
The process for modifying a shader actually used by the game is roughly:
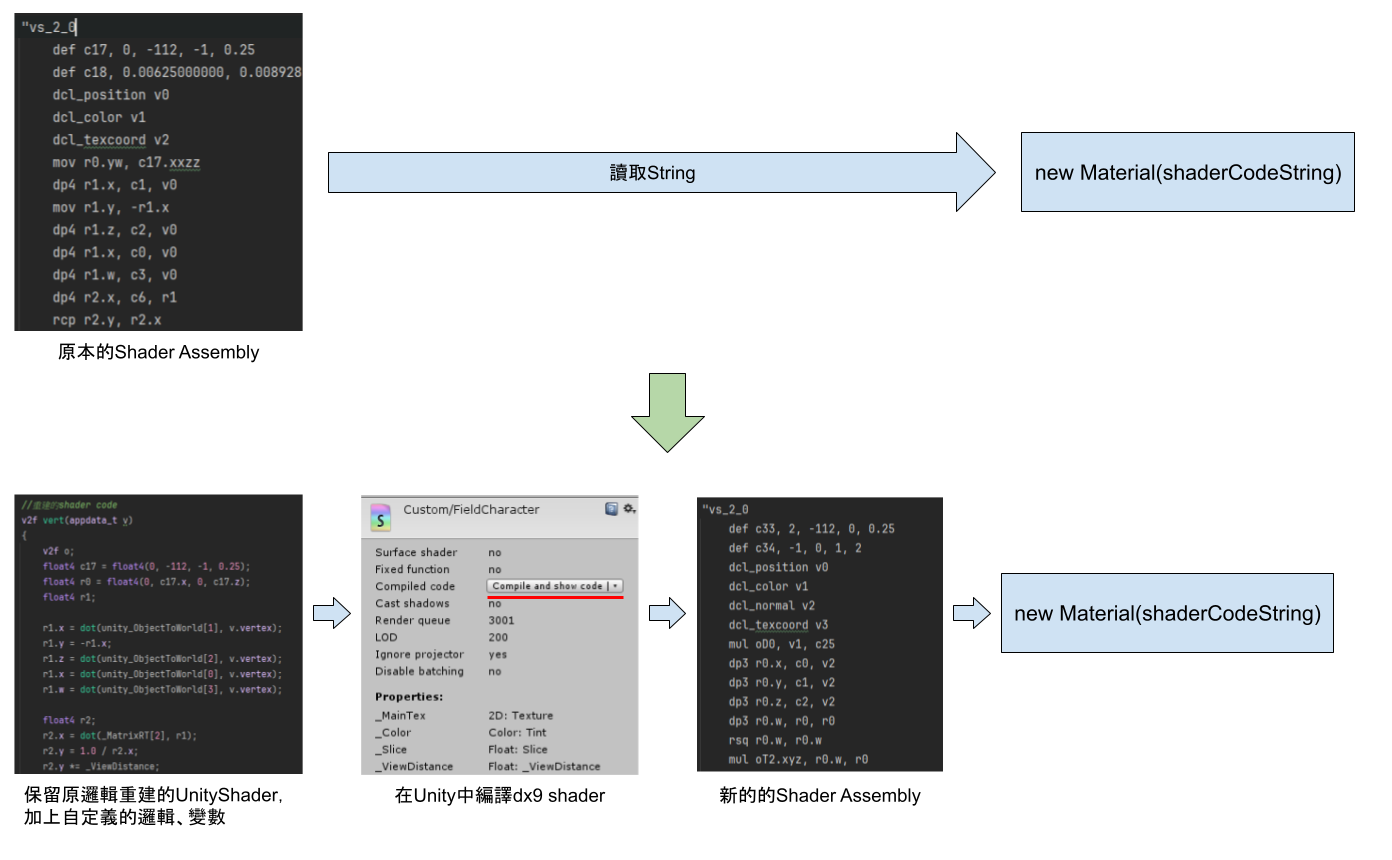
Working backward from assembly code to the original Unity shader is probably the least interesting part of this post.
First, consider this part of a vertex shader:
In dcl_position v0, v0 is the vertex position. In Matrix 0 [glstate_matrix_modelview0], c0 is a 4×4 matrix variable. c0 also represents the first row, c1 the second, c2 the third, and c3 the fourth row.
A 4×4 matrix occupies four variable slots, so the next variable declaration starts at
c4.
According to the dp4 documentation, the assembly above can be reconstructed in Unity shader syntax as:
By reasoning backward in this way, we can theoretically reconstruct an extremely unreadable shader assembly in Unity.
Here is a common piece of pixel-shader assembly:
In HLSL, this code is equivalent to:
This assembly samples a texture and performs an alpha clip using the cutoff value and the texture’s alpha channel.
For a shader-assembly beginner like me, fully reconstructing a shader this way is difficult because the Shader Compiler optimizes the code. The assembly we see often differs greatly from the original HLSL shader. The code order and variable values can be completely different after compilation; the only thing that remains the same is the final output.
Depending on the situation, I use three approaches:
- If the vertex-shader logic is difficult to reconstruct, retain the original assembly and manually insert the required assembly into the original file, taking care not to break the existing logic.
- For a simpler shader, reconstruct the Unity shader by eye, compile the entire new Unity shader into DX9 assembly, and replace the original assembly.
- For a more complex shader, copy the assembly code one-to-one into a Unity shader using HLSL syntax, add the desired features at the end, and compile the new shader again.
💡 The screenshot at the beginning of this section uses the third approach.
Blinn-Phong lighting, toon shading, and outlines
After restoring the assembly to a Unity shader, I implemented lighting models in the pixel shader. I made two kinds: toon shading and a slightly modified Blinn-Phong model. I also used masks based on color contrast and lightness to keep Blinn-Phong specular light off the characters’ skin. The result is… okay. Ideally every character and monster would have an extra texture controlling specular intensity and range, but that would be a huge task and I did not plan to do it.
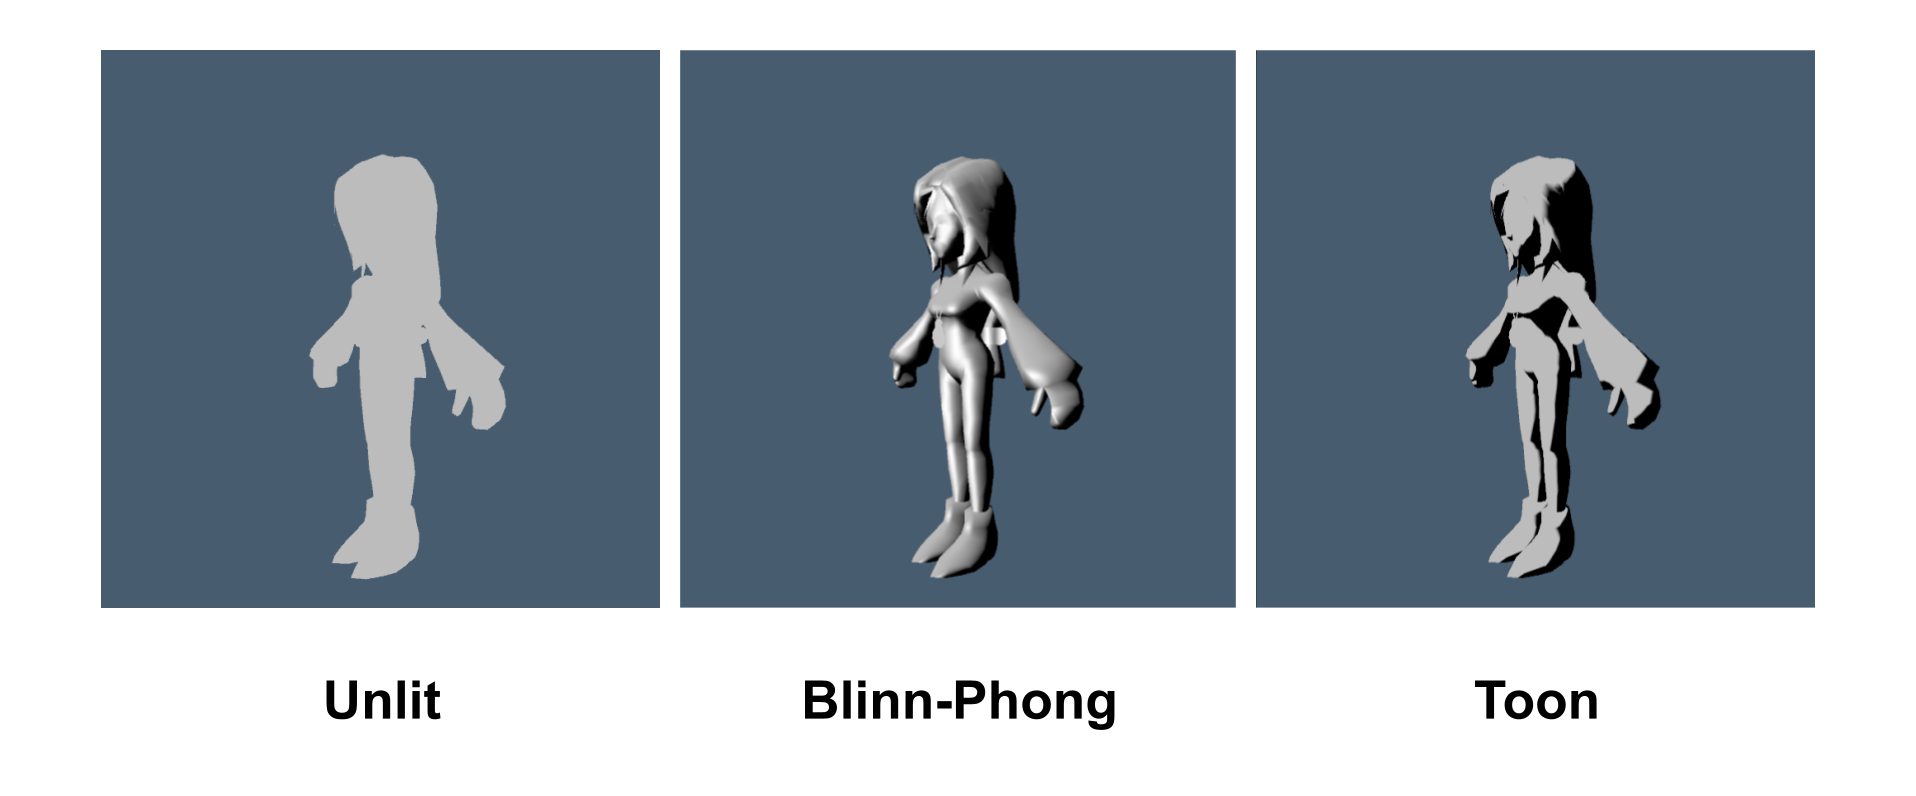
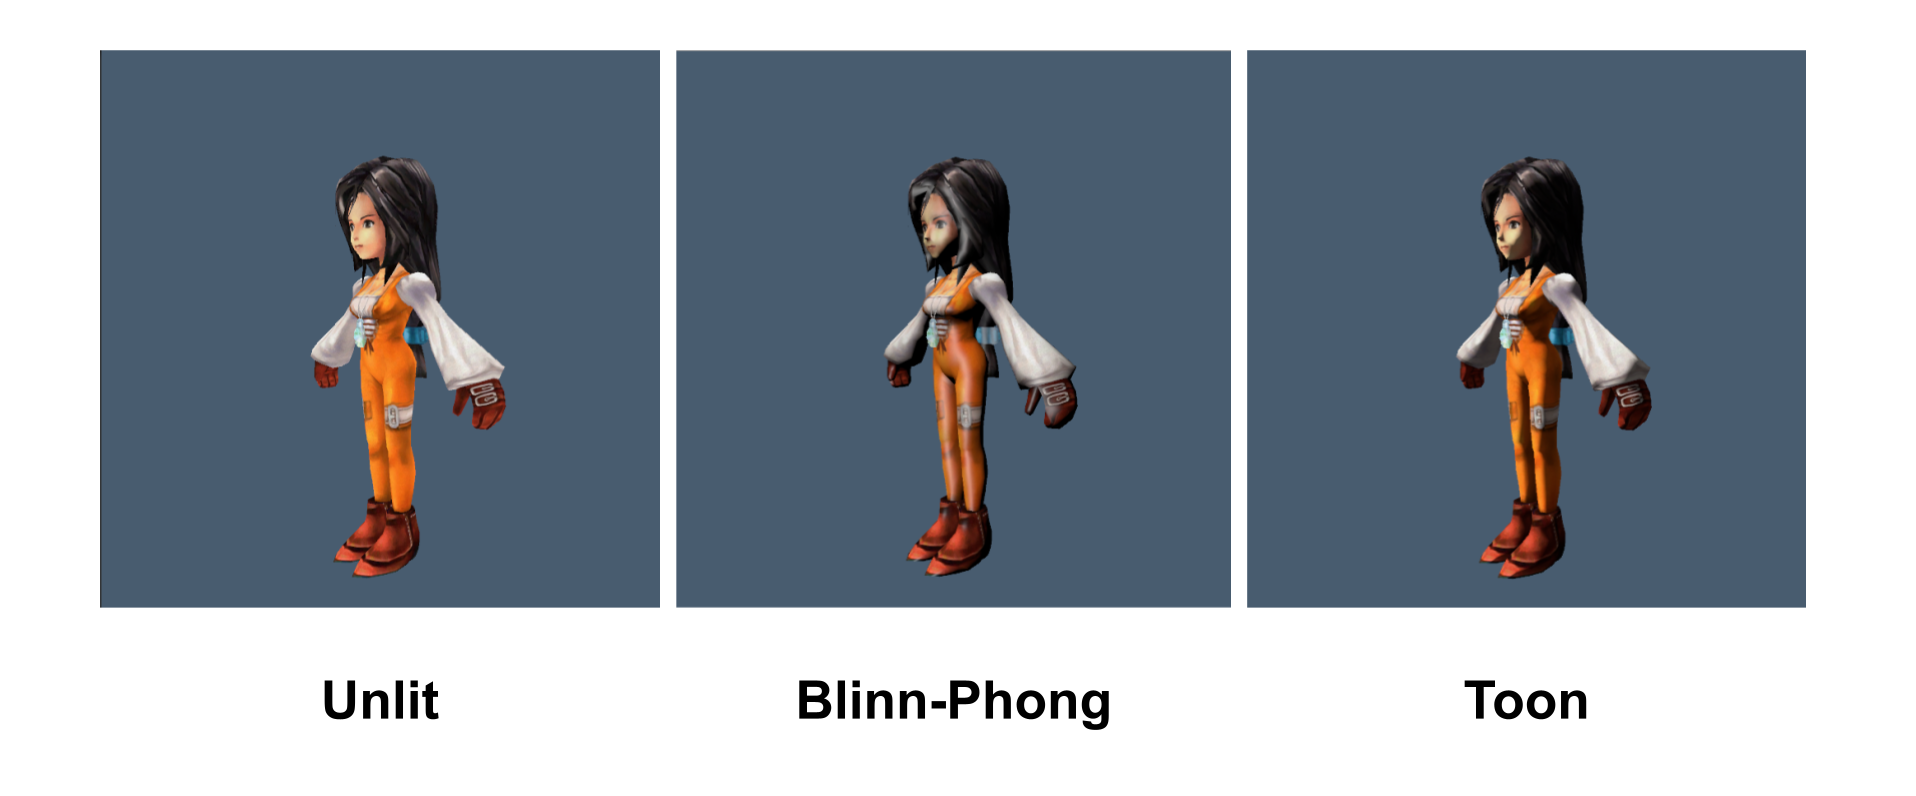
The images above compare the original game without per-pixel lighting, per-pixel Blinn-Phong, and toon shading.
For the outline, I added an outline pass to the shader assembly and used simple normal extrusion. The normals were already smoothed (see the next section), so the result was usable.
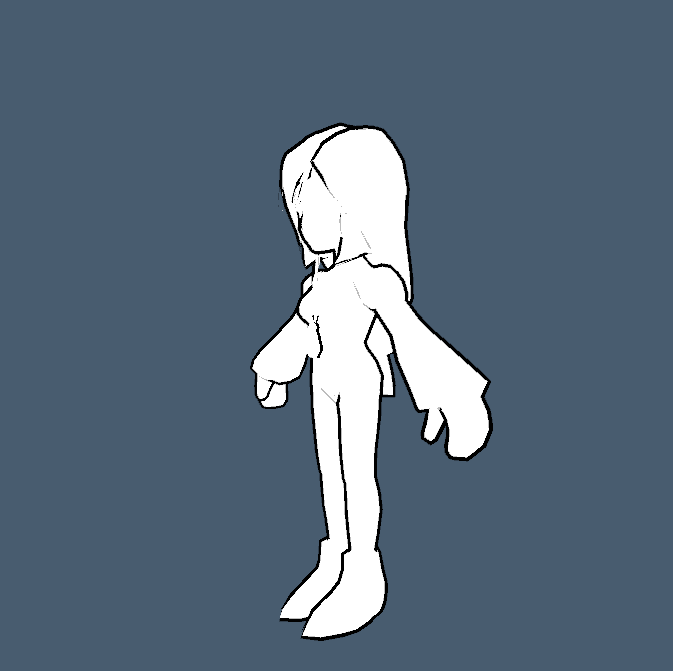
💡 FF9 represents all game color with textures and vertex colors, so the scenes contain no light sources. The light direction I added is simply a hard-coded variable.
Smoothing model normals at runtime
FF9 was released in 1999, and by current standards its character models have very few polygons. Since the characters were not lit (their brightness was controlled directly with vertex colors) and used only textures, the low polygon count was not a problem.
Lighting in the shader changes that. Lighting usually depends on the model’s normal information, and some low-poly models look like this after lighting is added:
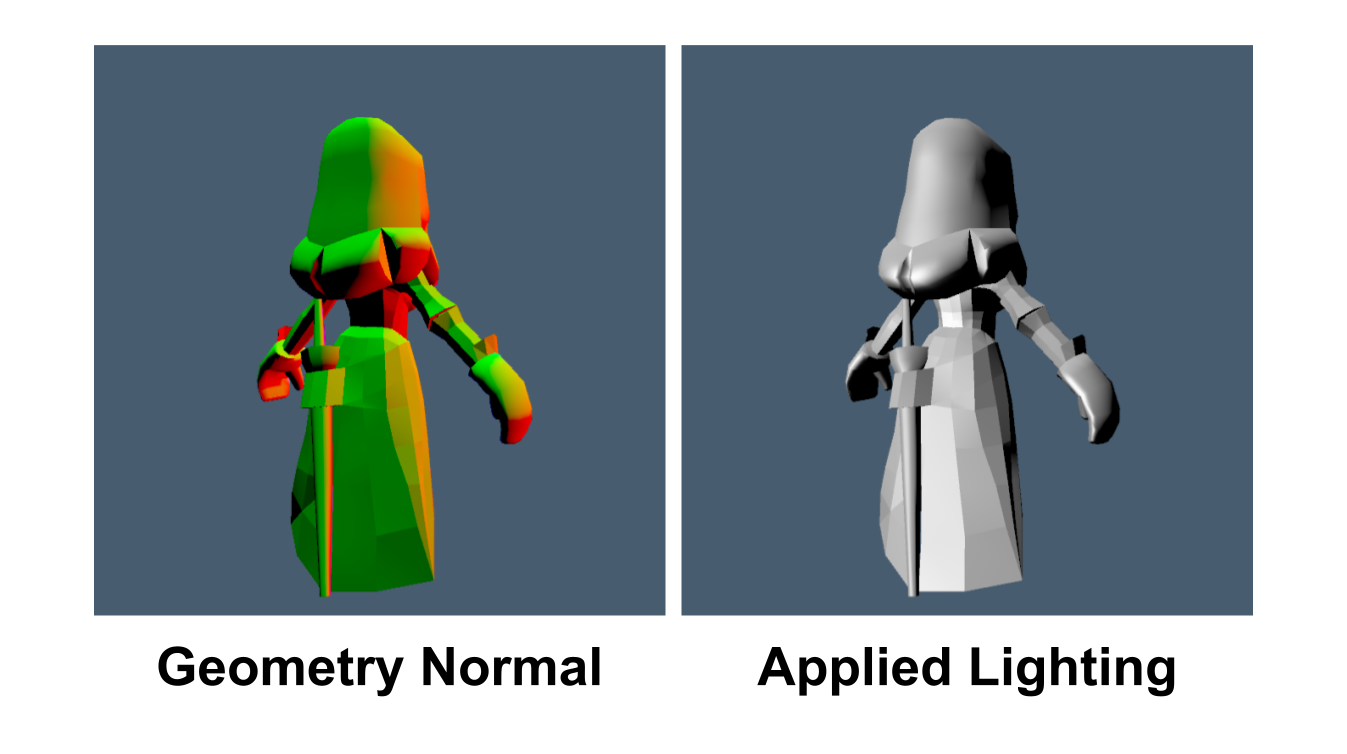
Normals like those in the image produce flat shading with a lighting model, and the result is terrible with toon shading. To avoid ugly lighting, the normal vectors stored on the model’s vertices need to be smoothed. Fortunately, even Unity 5 lets us modify model normals at runtime.
At runtime, extract the model normals, calculate smoothed normals, and store them back in the mesh in memory. Recalculating every vertex normal on the main thread is expensive, but the game calculates it only once when a character loads, and the character models have few faces, so the current implementation still runs on the main thread. (In newer Unity versions, the same operation could use the Job System and Burst to avoid blocking the main thread.)
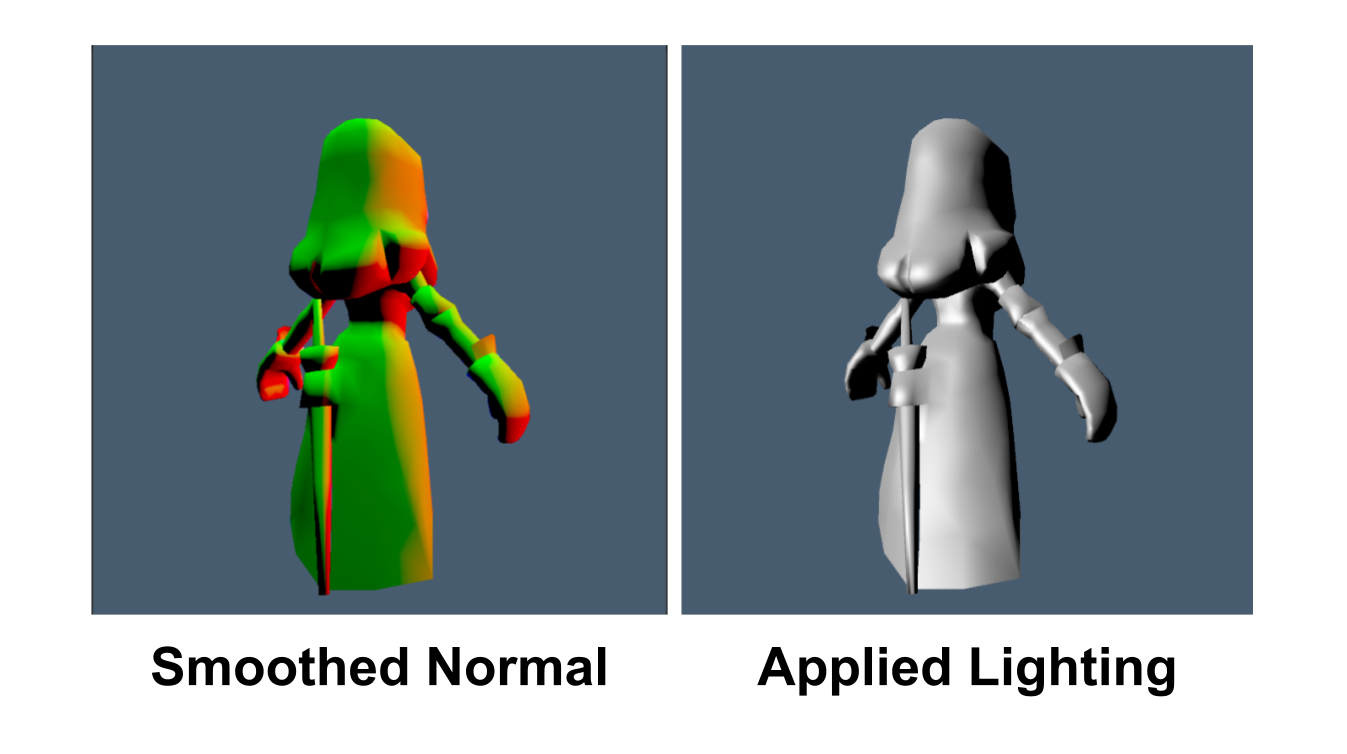
Over-aggressive normal smoothing is not appropriate for realistic 3D models because it removes detail. For an FF9 mod, however, it is the only way to solve the original flat-shading normals, and FF9’s stylized character design makes it a good fit.
Ambient light
After smoothing the normals and adding per-pixel lighting, the changes in brightness on the characters look much better. Without special handling, however, the unlit side becomes completely black because the shader lacks diffuse ambient light from Global Illumination.
The image below shows that a shader without ambient light makes dark areas too dark and loses detail. With ambient light, the dark areas are usable, and mixing the other colors with the ambient light makes the scene more natural.
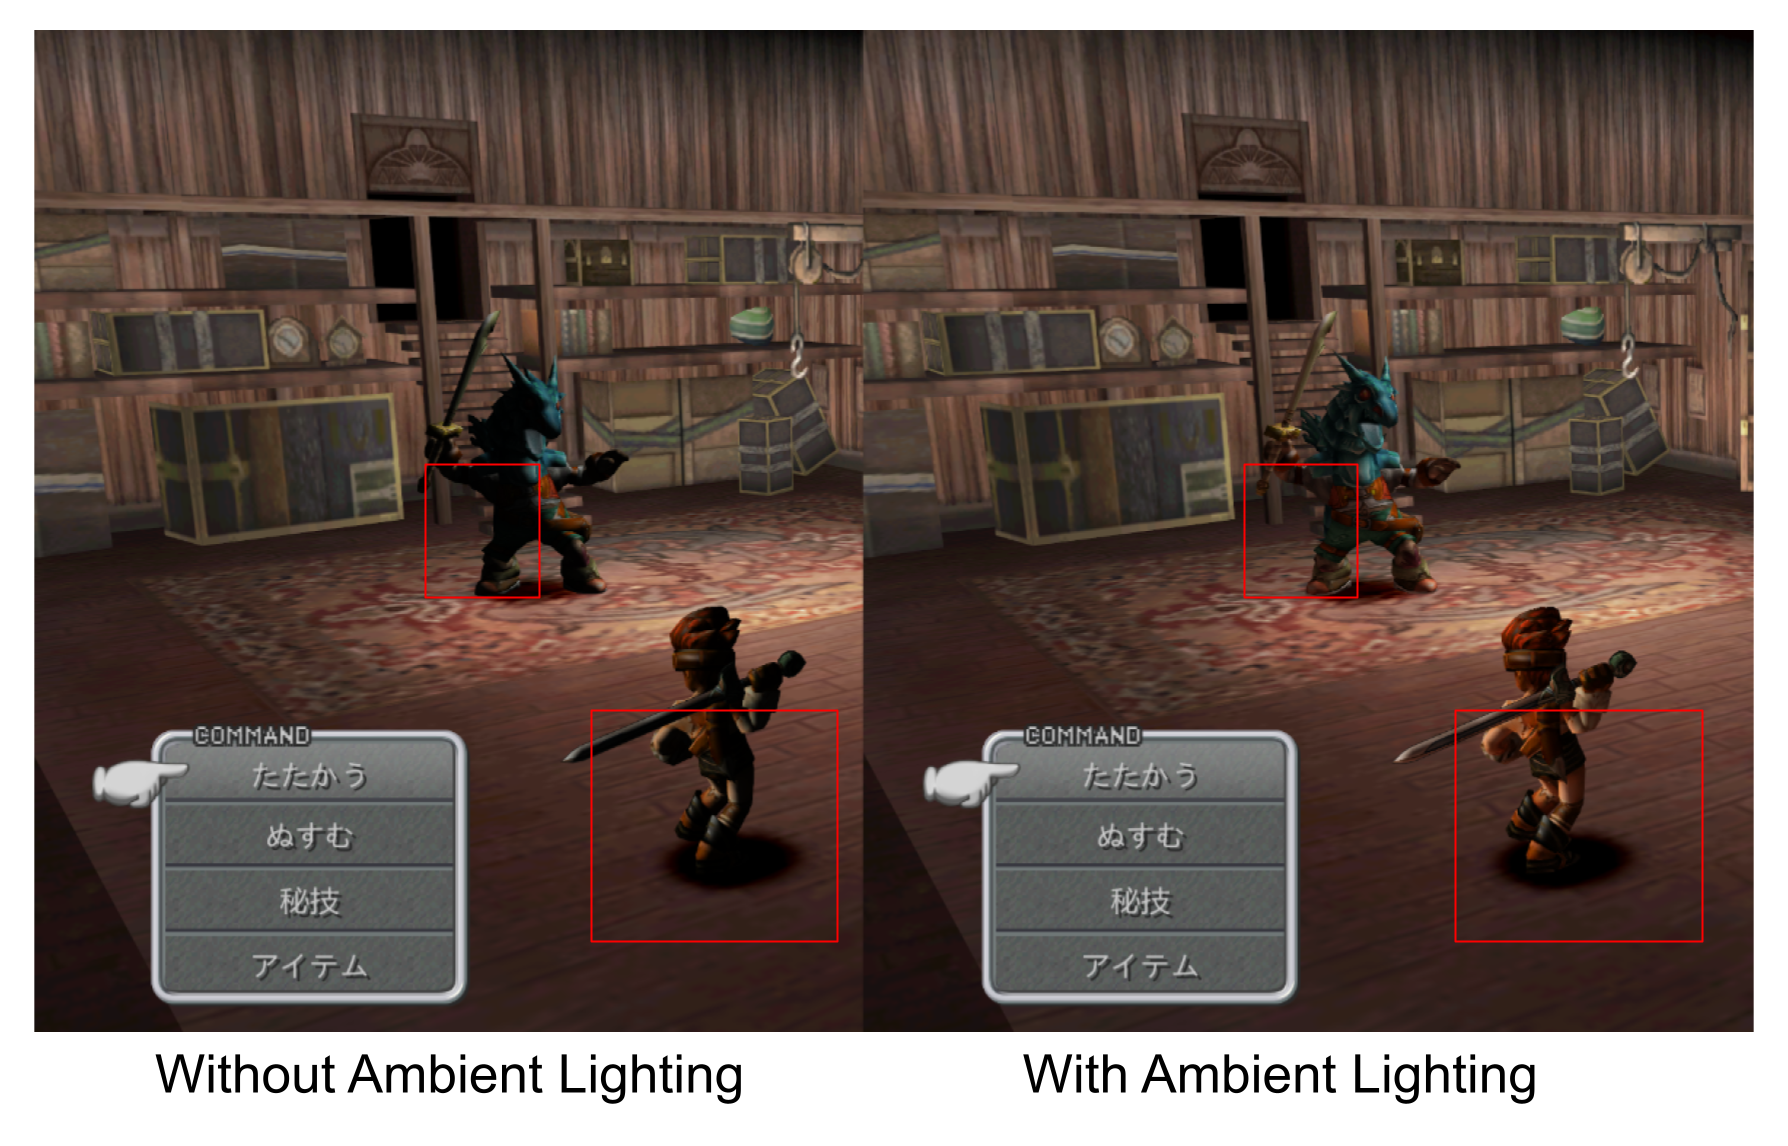
I could use a constant as ambient light, but every scene would then have the same ambient light, with no variation. A single color would also look too flat and would not suit Blinn-Phong. I wanted ambient light with better quality than a hard-coded constant.
In Unity, the main sources of environmental diffuse light depend on the workflow:
- Baked directly into a lightmap during offline baking.
- Stored as second-order spherical harmonics in the scene’s light probes during offline baking.
- When neither a lightmap nor a light probe is available, calculated from the current skybox as diffuse irradiance and stored/sampled in the form of second-order spherical harmonics.
- Enlighten GI.
- SSGI (HDRP).
💡 In an unbaked Unity project without special settings, 3D-object shadows are often blue because the final fallback is diffuse irradiance from the default skybox.
FF9 has all of these options disabled by default, and I can only modify things at runtime, so offline baking is impossible. I decided to use diffuse irradiance calculated from the skybox as ambient light. Fortunately, Unity supports replacing the skybox at runtime, and calling DynamicGI.UpdateEnvironment makes Unity automatically store the skybox’s diffuse irradiance as second-order spherical harmonics.
How can we generate a skybox dynamically while the game is running?
I used a very lazy method: generate a Reflection Probe component in the scene, capture the surroundings as a cubemap, put the cubemap into a skybox material, and pass it to Unity as the scene skybox.
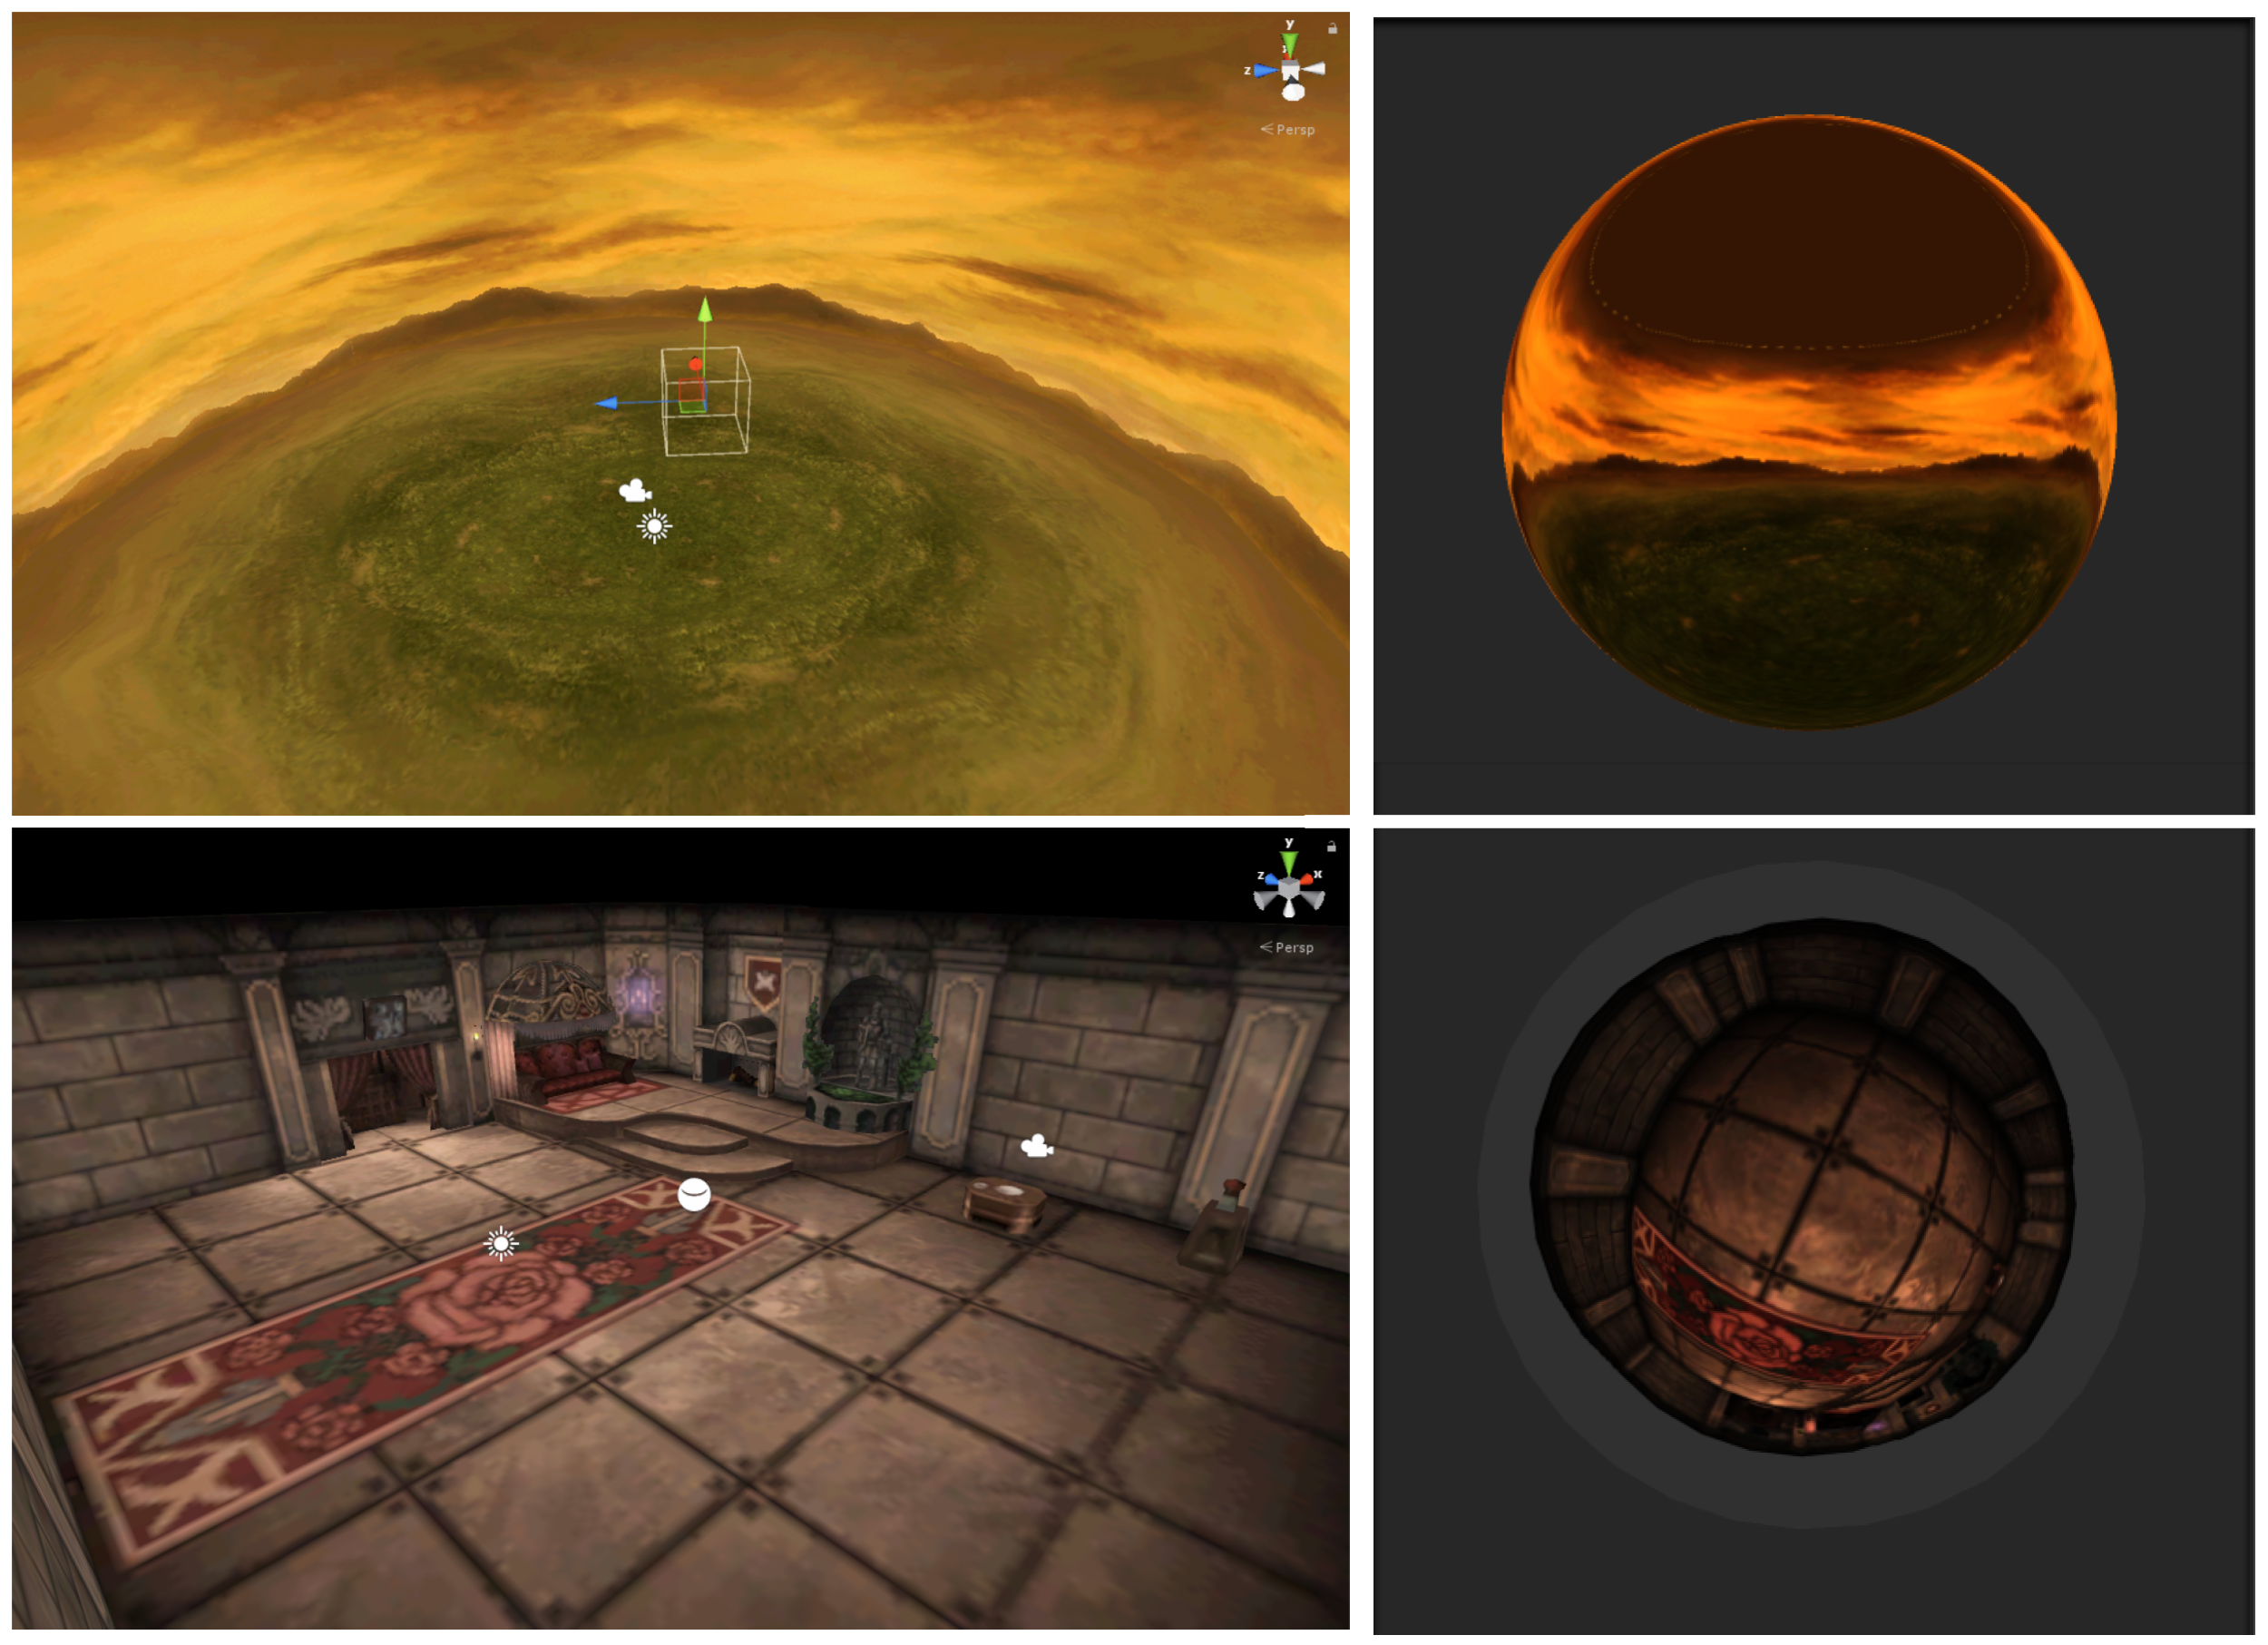
The difficult part is the reflection-probe position and size. FF9’s camera matrix and camera usage differ greatly from those in an ordinary Unity project, whether in combat or outside it. The coordinates of the 3D battle scene and characters are therefore strange. I eventually generated the reflection probe a few meters above a character in the player’s party, which was the only position that captured the whole battle scene correctly.
After successfully generating a corresponding skybox at runtime, I tested the game. The character in the image below is lit only by the dynamic skybox’s ambient diffuse light in different battle scenes.
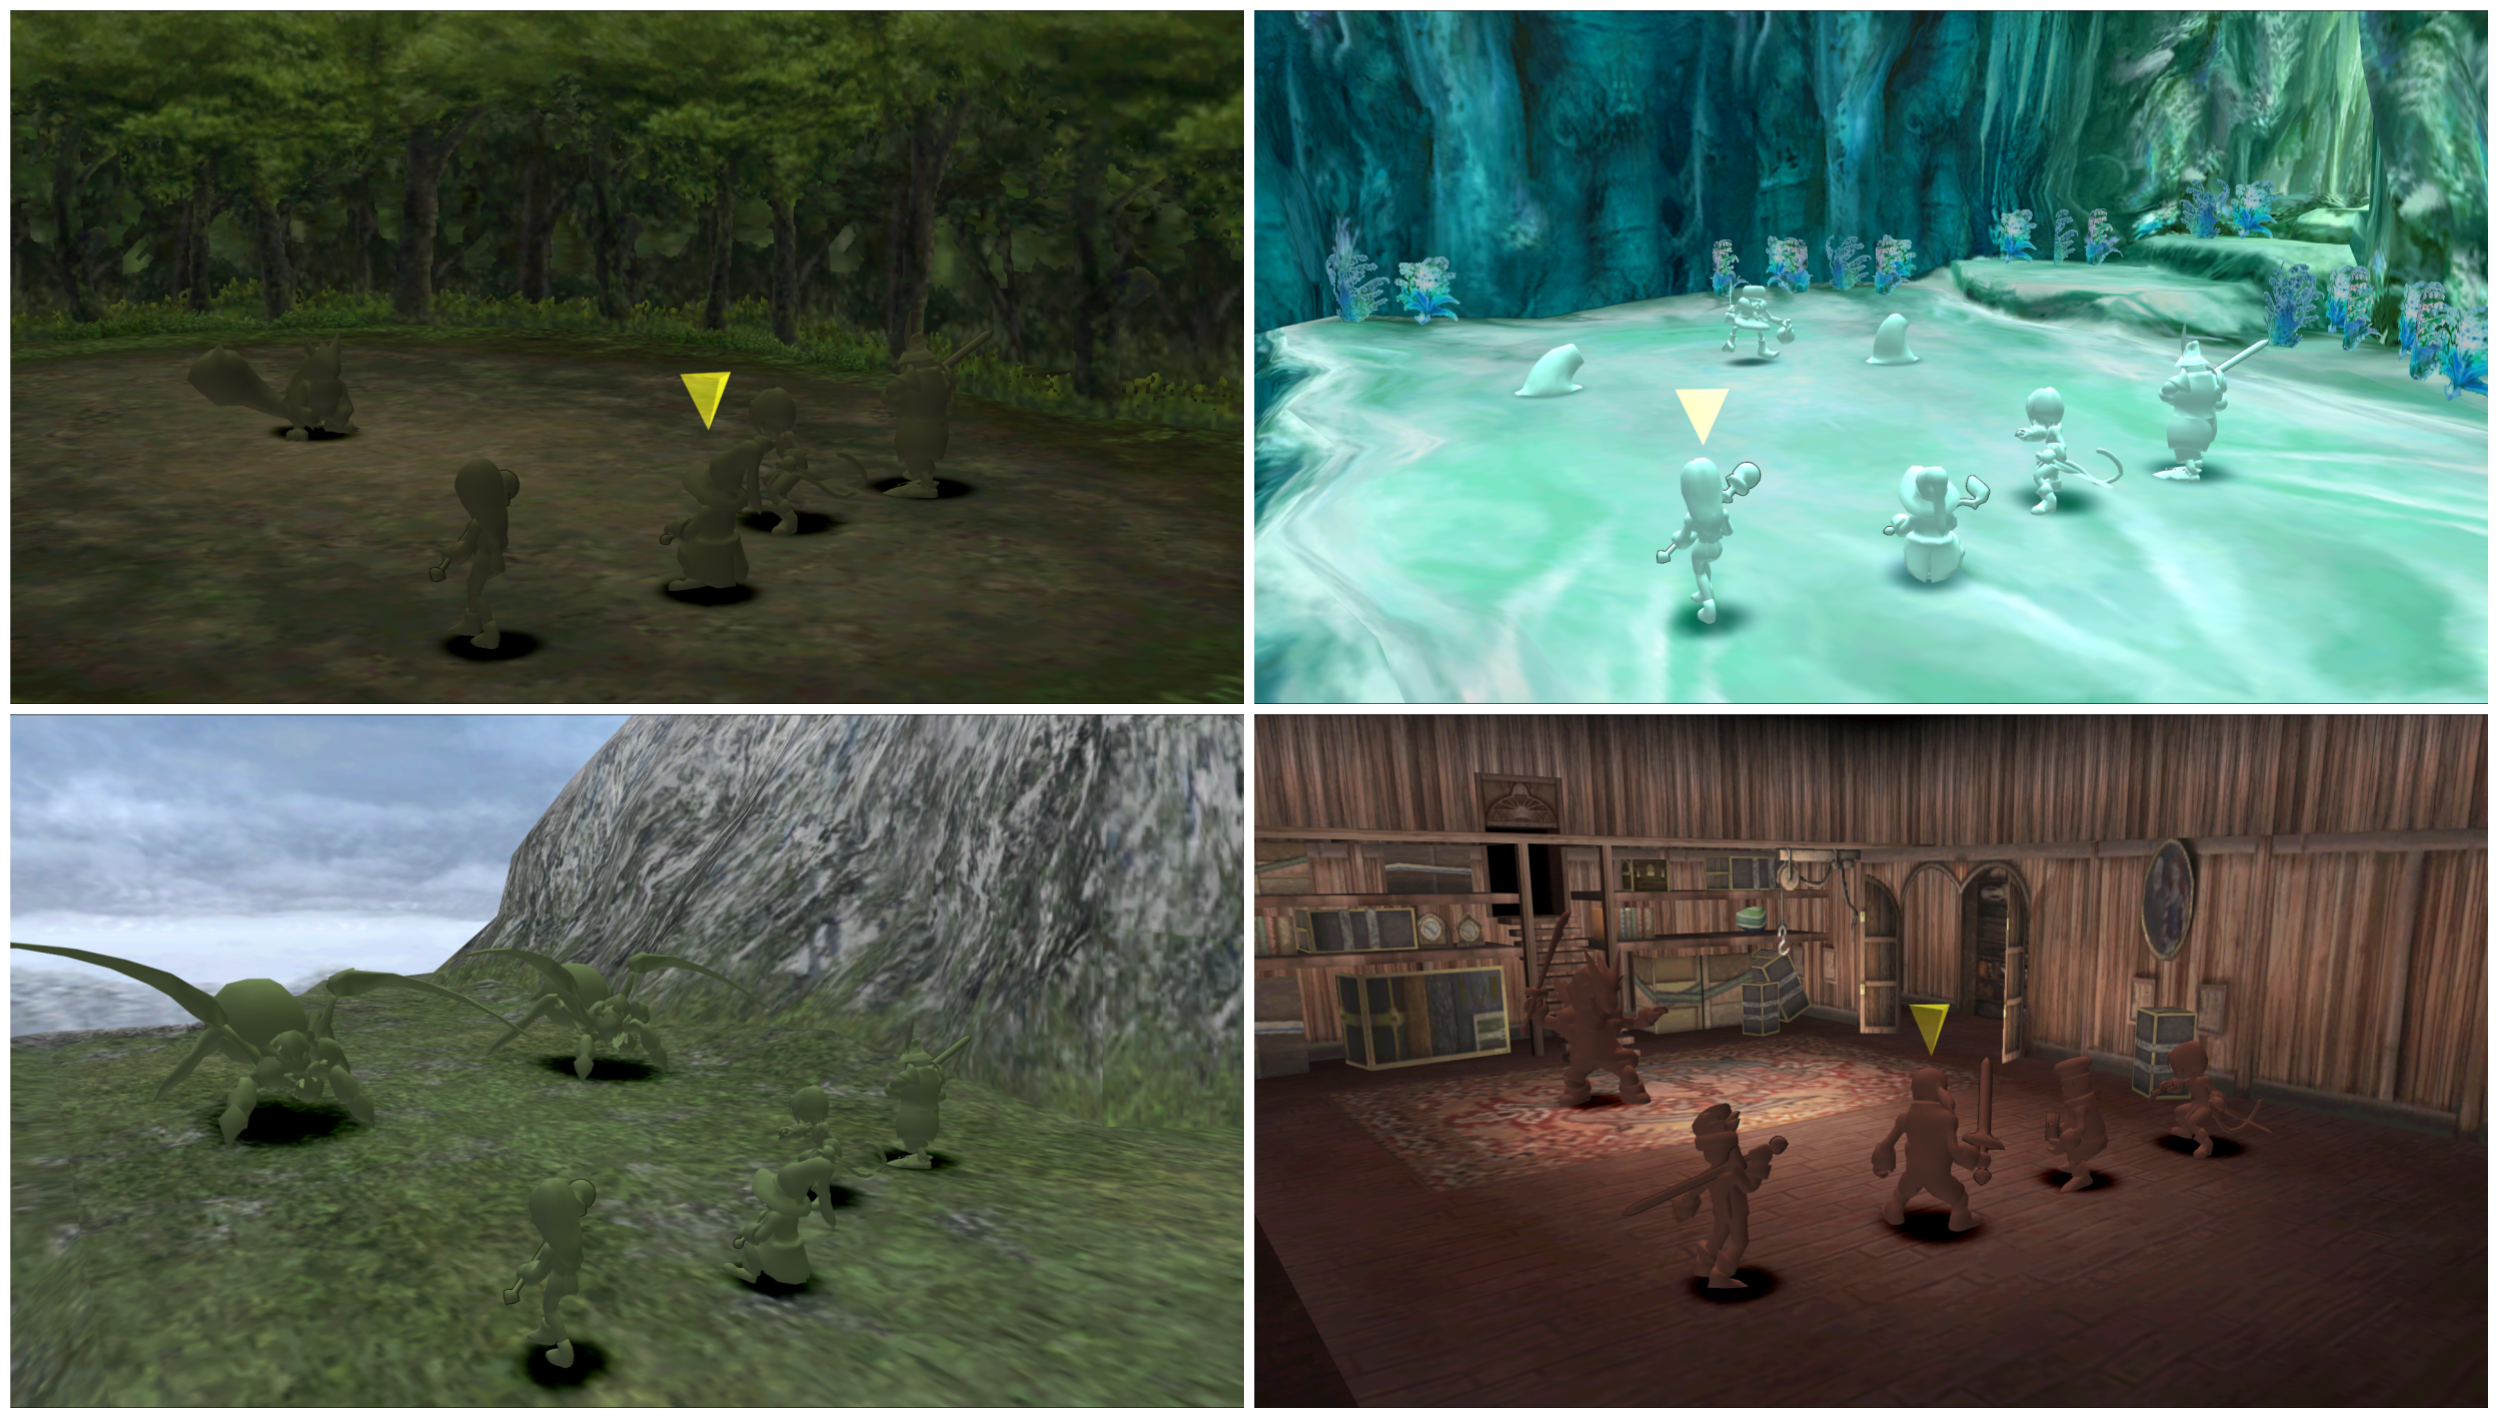
The ambient diffuse light is green in both cases, but the enclosed forest is darker and the open mountain area is brighter. Second-order spherical harmonics also produce different colors from the character’s world-space surface normal, which looks much better than a single hard-coded color. Relying only on the skybox does not match offline baking, but it is more than sufficient for FF9’s battle scenes.
💡 In Unity’s Built-in RP, any shader with a “ForwardBase” tag can sample spherical-harmonic data.
Tone mapping
Sampling ambient light from the spherical harmonics creates another problem: the characters become too bright and pale. FF9’s project uses a non-HDR buffer, so each pixel’s shader output cannot exceed 1; values above 1 are clamped to 1.
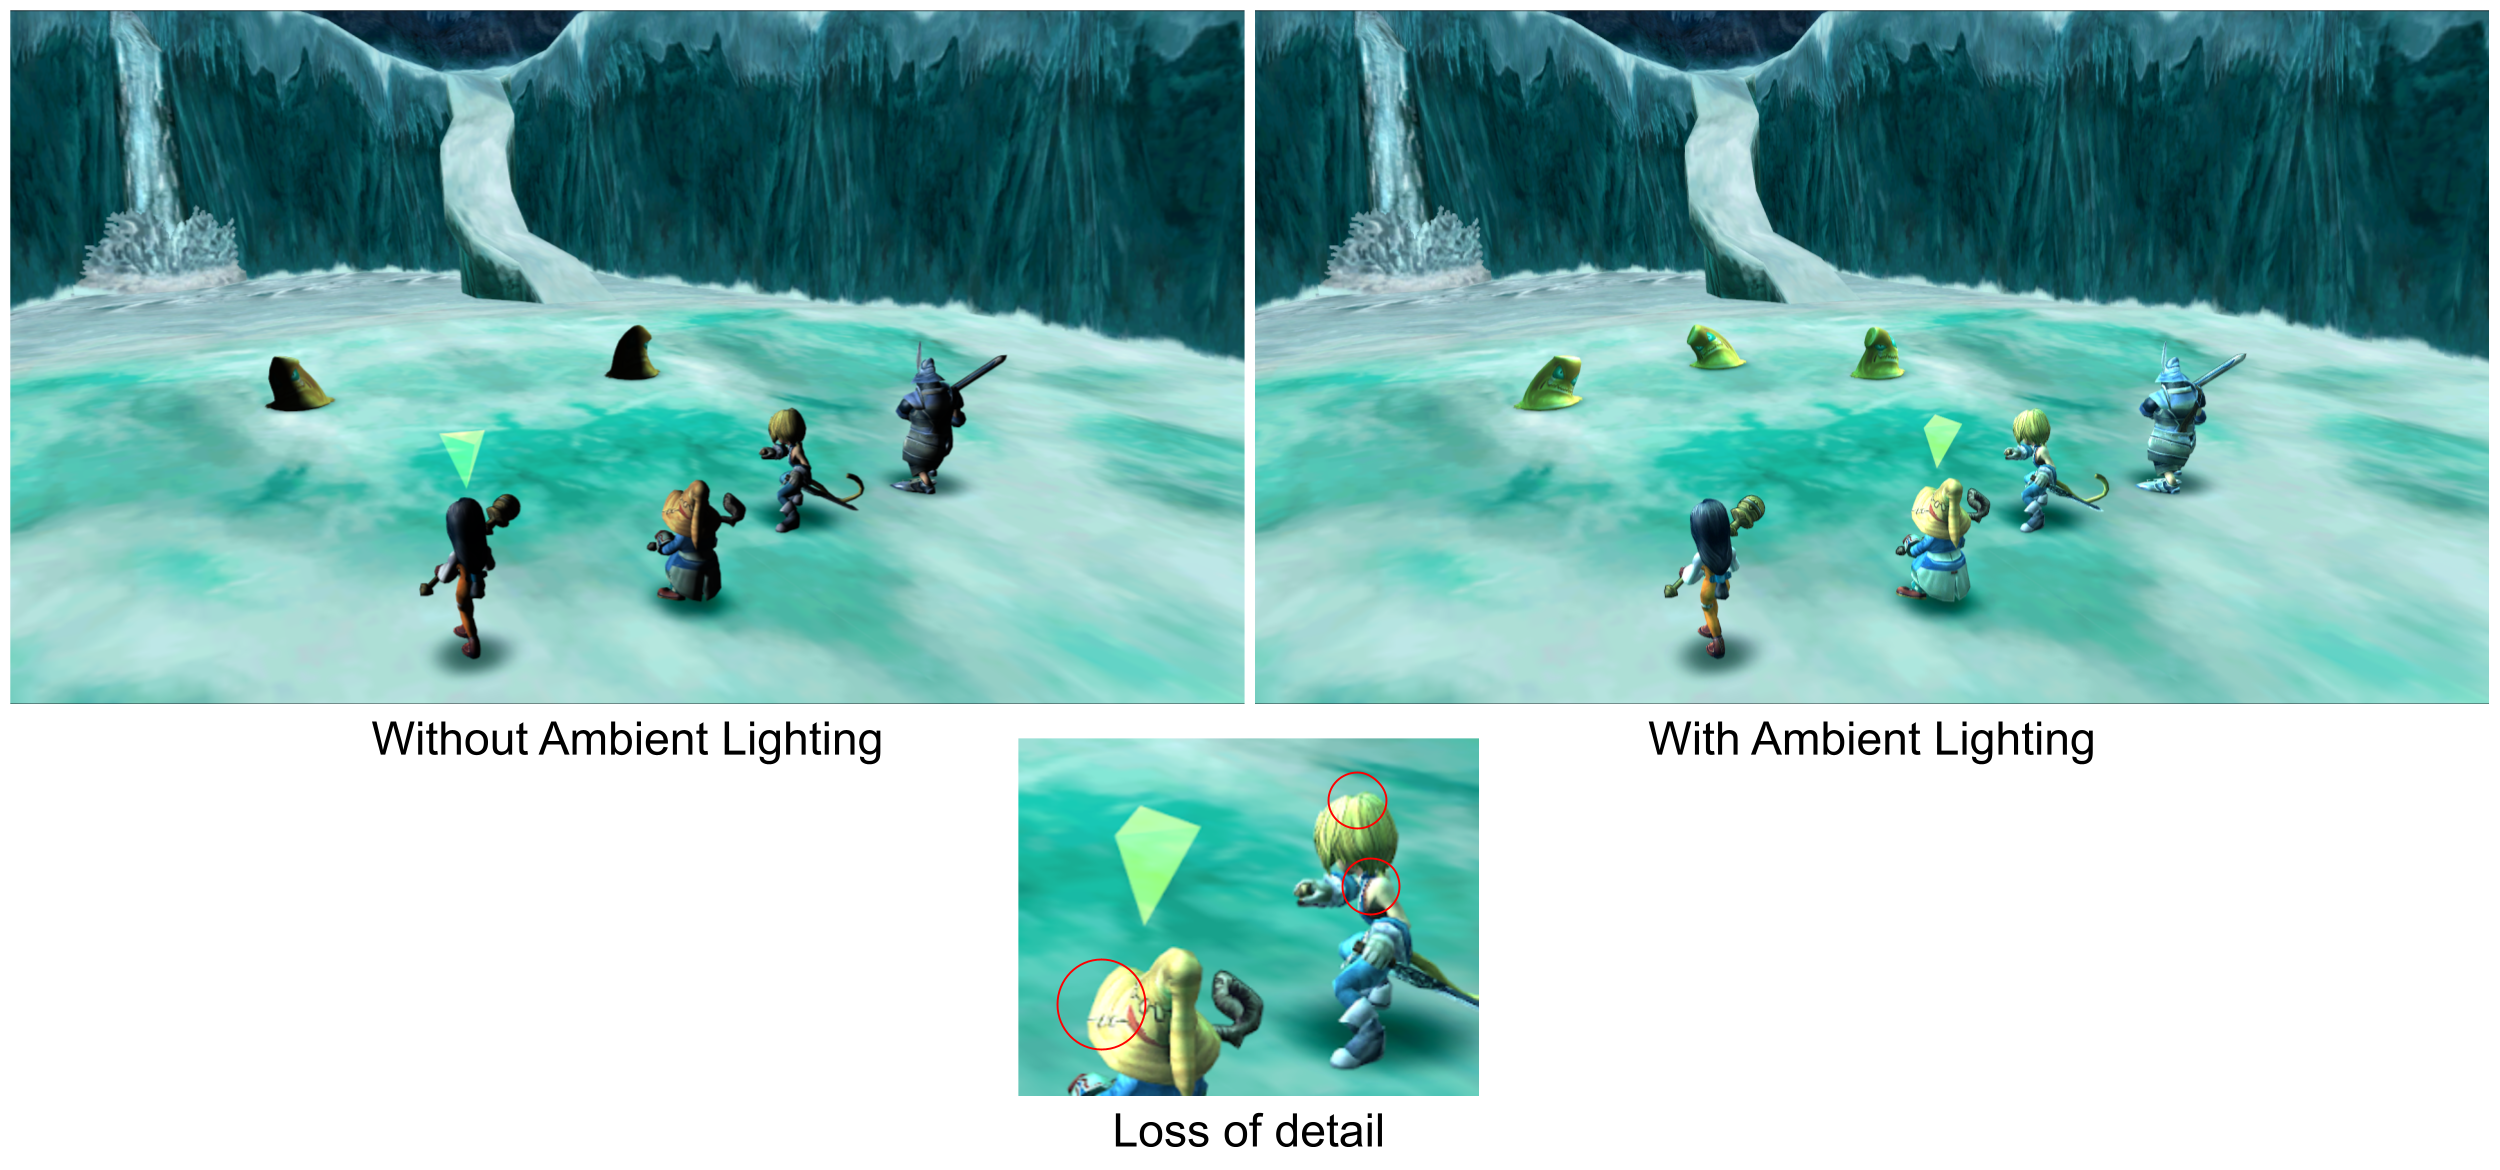
As the image shows, adding ambient light prevents dark areas from becoming too dark, but bright areas can turn white because their RGB values exceed 1 and detail disappears.
To fix this, remap the shader’s output color from its current range to 0–1: tone mapping. I do not perform tone mapping in the usual full-screen post-processing stage because pixels outside characters do not need it. Instead, immediately before outputting the pixel shader color in the character shader, I tone-map the character color back into LDR.
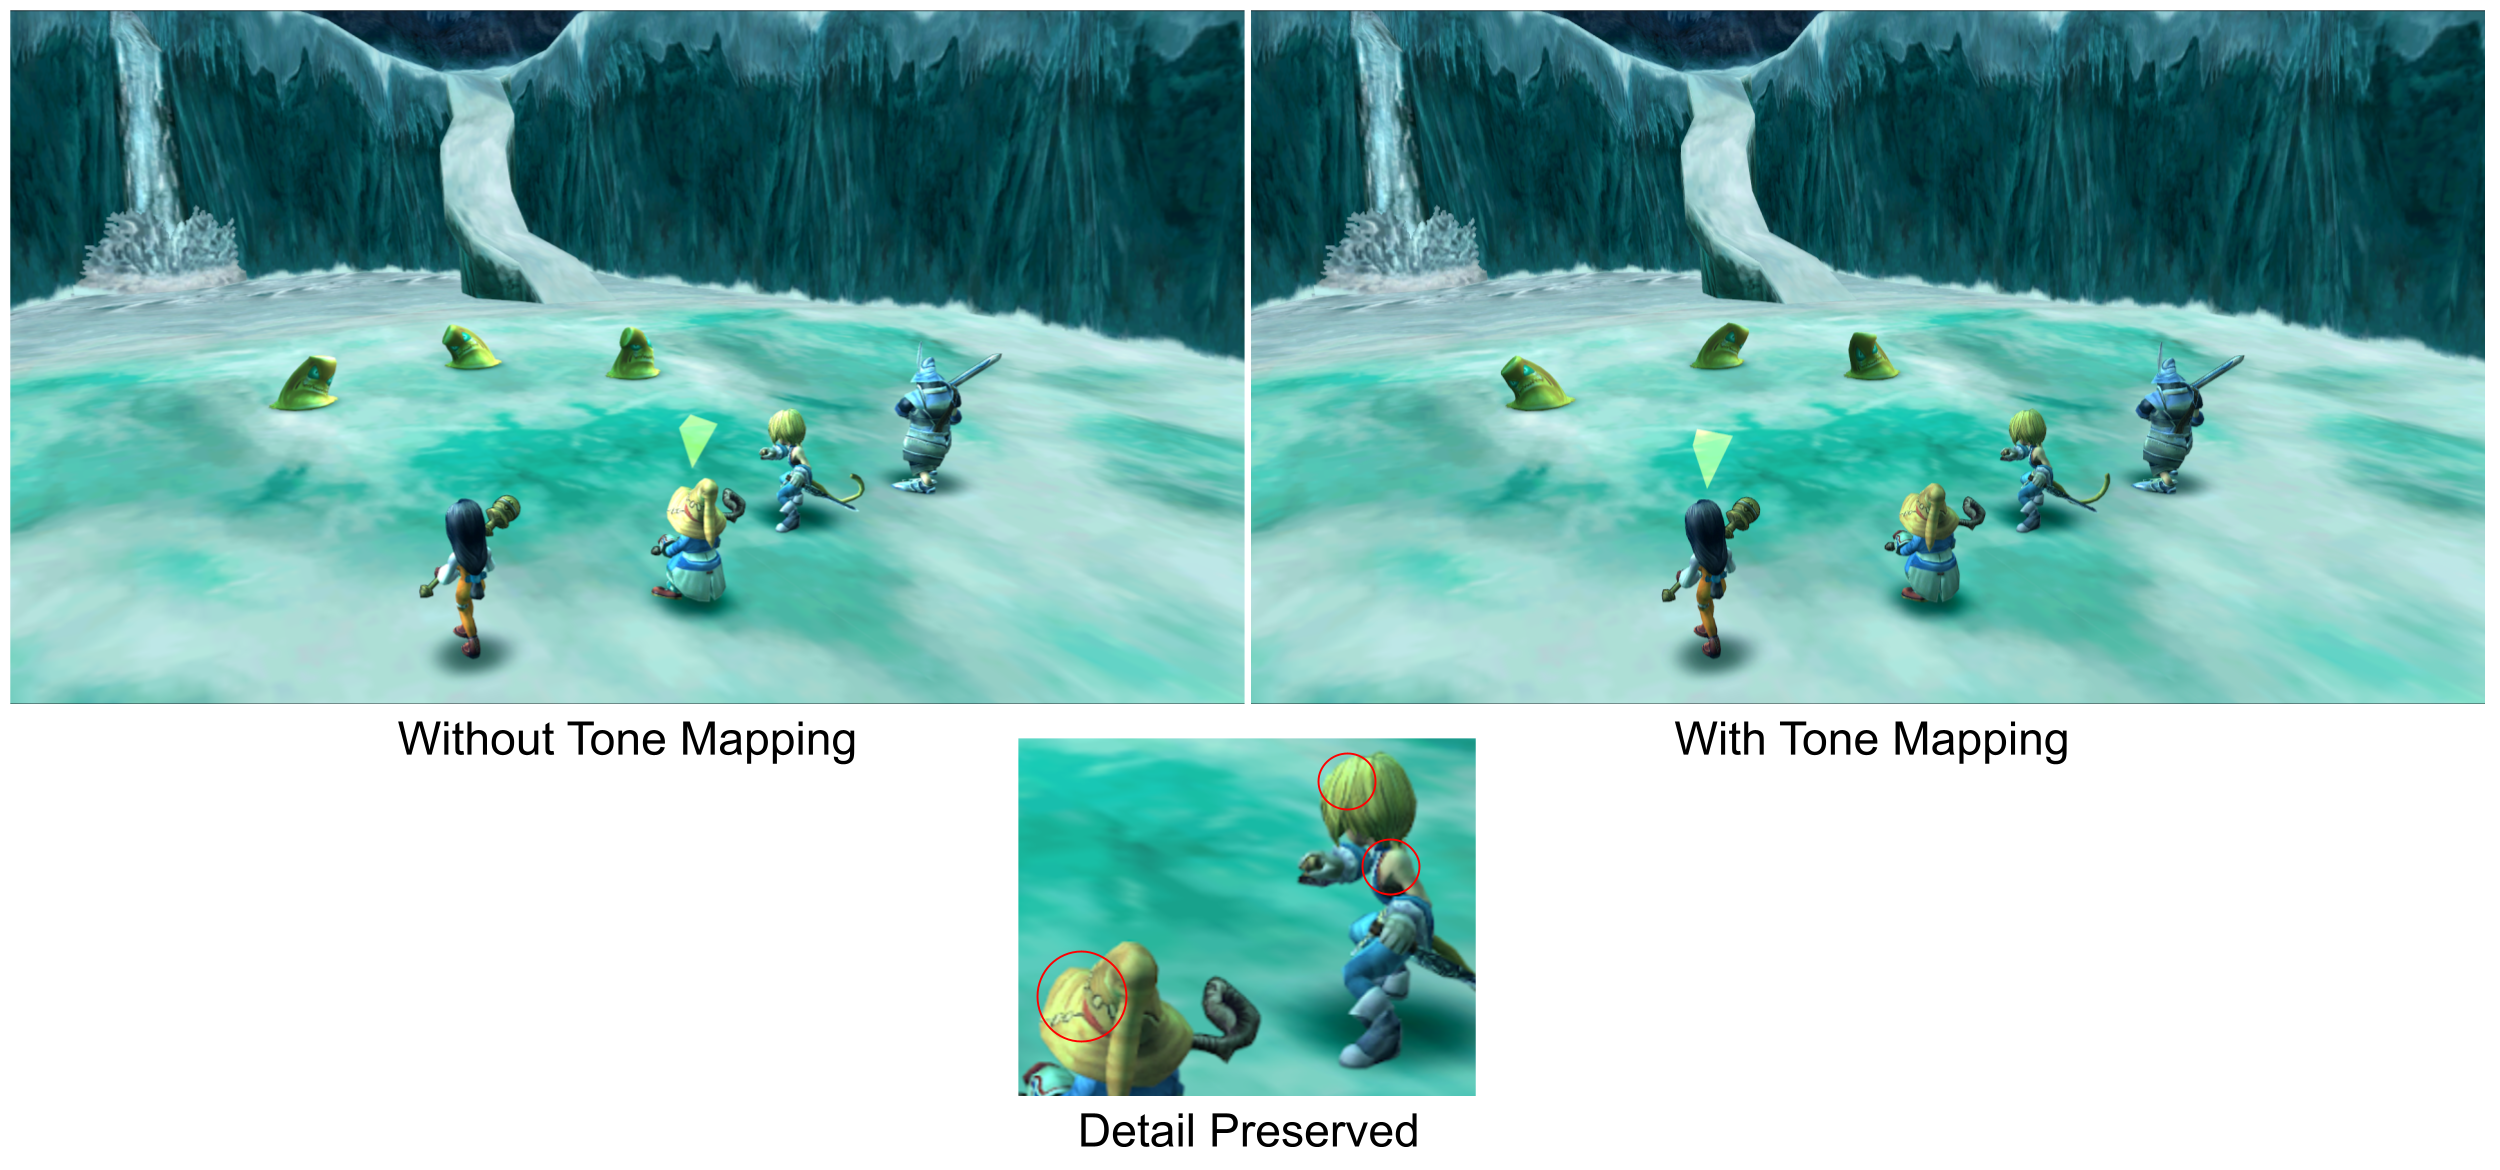
The over-bright area on the character’s head in the image above retains its detail after tone mapping.
💡 For HDR and LDR, see this LearnOpenGL explanation.
Improving the battle-scene sky background
FF9’s battle scenes are fully 3D. Characters and enemies stand at the center, while most other 3D models surround the center in a circular arrangement. Sky effects are usually a circular or cylindrical model with a texture; rotating the model makes the sky or clouds move.
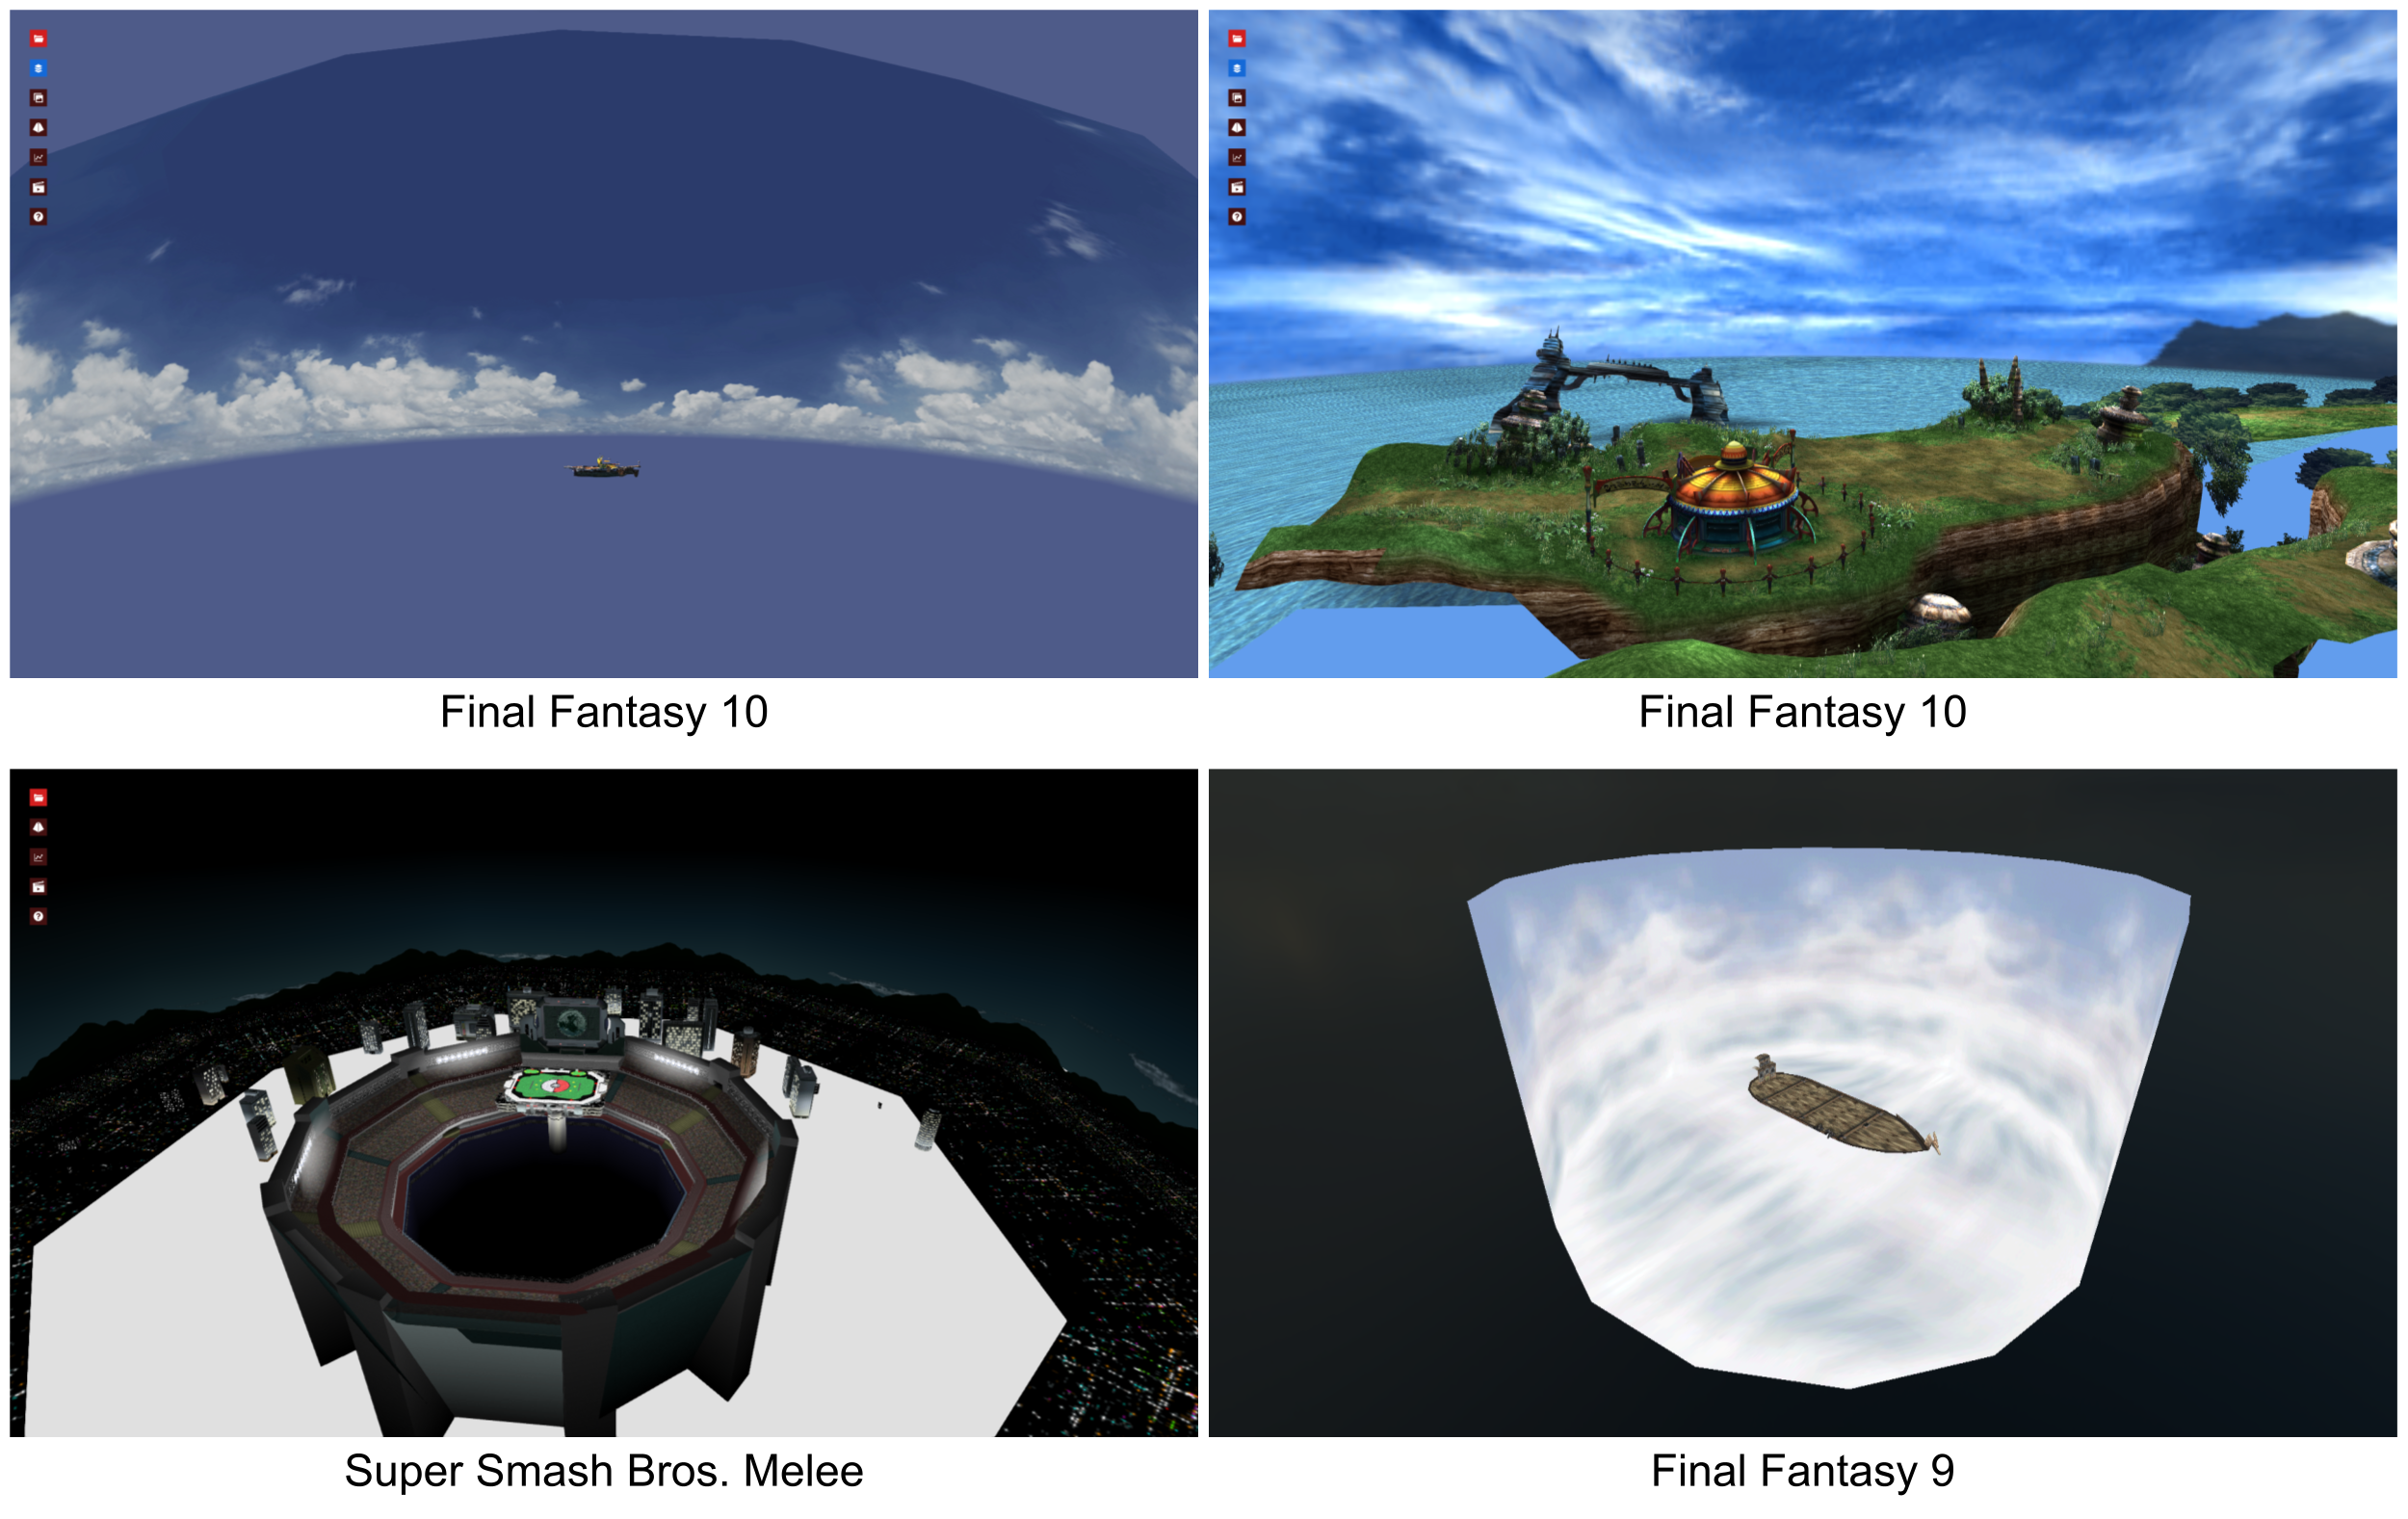
This way of displaying a sky background is still common today (the English keyword is “skydome”). It is intuitive for artists and level designers, but the effect depends heavily on the texture. Adding a new object, such as a floating cloud, requires many billboards orbiting around the player.
For an FF9 mod, adding extra meshes to the scene is not practical. The obvious solution would be a higher-resolution sky texture, but because the scene sky is only one cylinder, I still found that too monotonous and artificial. I began thinking about a Pixel Shader effect that could create more lively clouds on the existing cylinder. I remembered Unity HDRP’s _Cloud Layer, which does not use advanced techniques: it creates a fairly complex cloud effect simply with a Flow Map texture and adjustments to the sampling vector. After studying HDRP’s shader code, I thought it should be possible and tried porting the Cloud Layer shader to Unity 5.
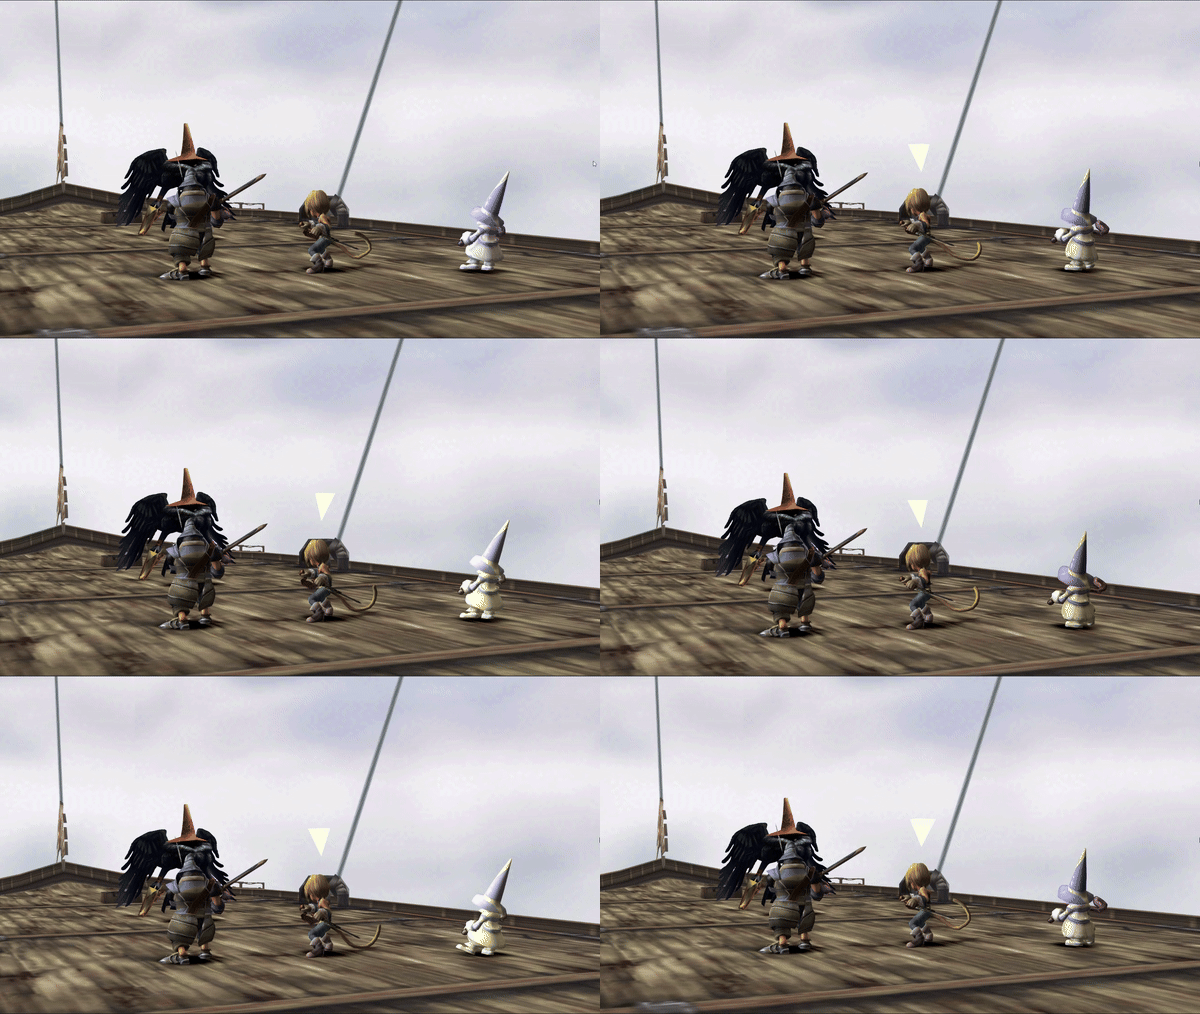
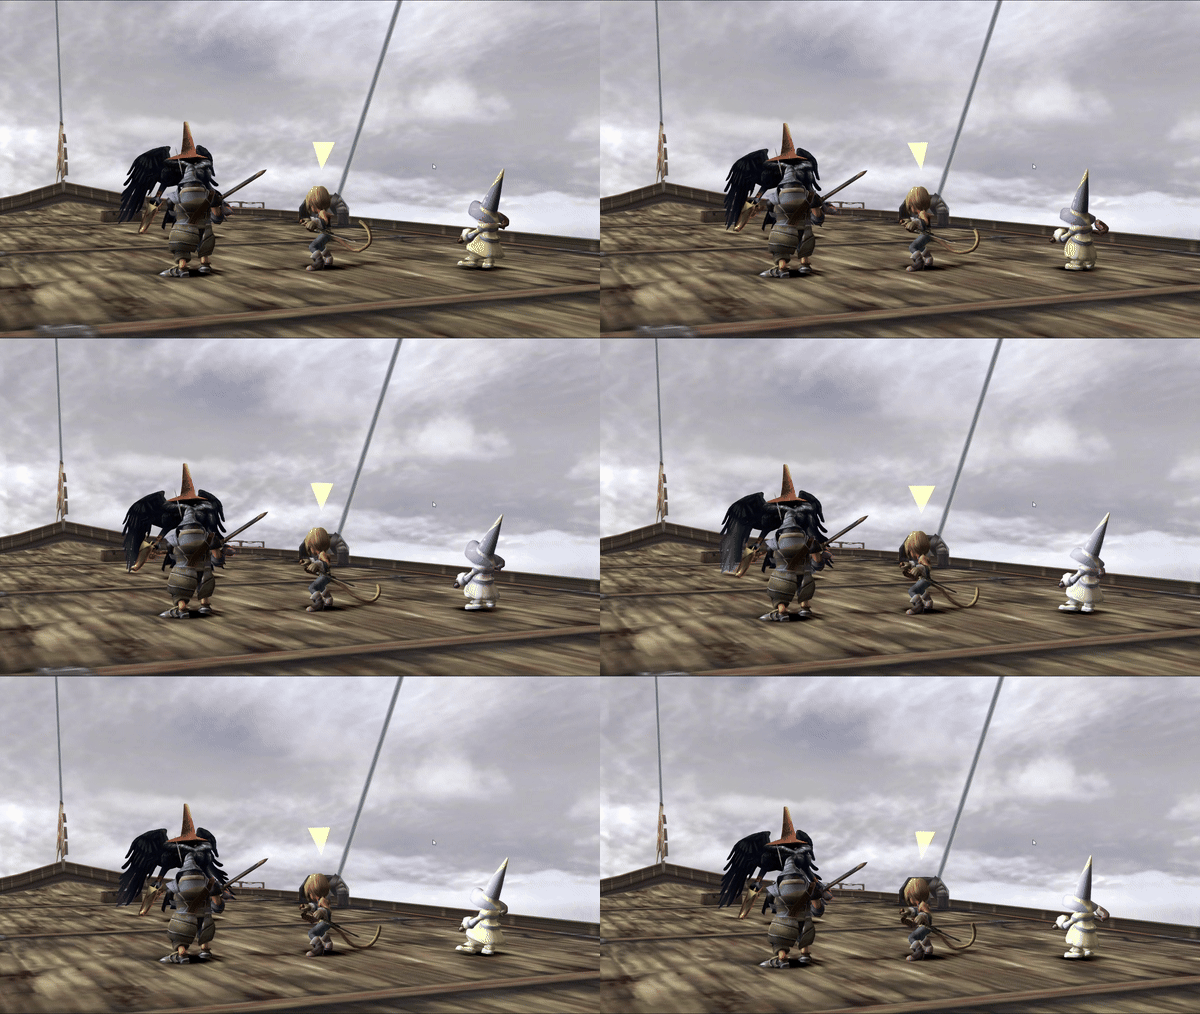
The result was unexpectedly good. After adjusting the blend between the original texture color and the tone-mapping strength, the sky had clouds that were many times more lively than before.
Results and what comes next
Comparing the final result
The character and monster shading is now complete. The video below shows a huge difference in the experience between the 2016 PC version and the 2024 modded version of FF9. The battle comparison starts at 25 seconds.
- Left: FF9 released in 2016—only the game’s native resolution and UI resolution are increased.
- Right: FF9 with the 2024 mod—high-resolution backgrounds, widescreen support, character animation increased from 15 to 120 FPS in battles, per-pixel lighting added while writing this post, and a more lively background.
Techniques used in the current FF9 shader modifications
- Blinn-Phong and toon shading
- Generate a cubemap, calculate ambient light, and store it in spherical harmonics
- Smooth normals
- Use each pixel’s camera-relative world-space view direction as the UV for sampling a texture (Cloud Layer)
- Tone mapping
By 2024 standards, none of this is ray tracing; it is all extremely basic. Most of these techniques can be learned from LearnOpenGL. Even without flashy techniques, the image feels like a completely different game—like an HD remaster of a PS2 game, in my opinion.
I took a shortcut when storing cubemap irradiance in spherical harmonics by relying on Unity’s API to calculate it automatically. If you implement it yourself, I think this is the most complicated item in the list above. BakingLab is a useful reference.
Why not use PBR?
Adding PBR is possible, and performance is not the biggest problem. The biggest problem is the textures: for PBR to look good, every part of each character needs metallic and roughness textures, and there are simply too many types of characters and enemies in the game.
What comes next
There are still screen-space shaders worth trying in the 3D battle scenes, such as SSAO and Bloom/Color Grading. I successfully implemented HBAO in the battle scenes, but both its quality and performance have plenty of room for improvement. I will pause this FF9 shader side project here; if I ever have a lot of free time, I may experiment more with screen-space shaders.