1️⃣ 1. Installation Instructions and Prerequisites
0. Installation Steps Summary:
Verify Unity Editor Version Compatibility: Ensure you are using a version of the Unity Editor that is compatible with Anime Shading Plus.
Install Universal Render Pipeline (URP): Use either the Package Manager or the Unity Hub to install URP into your current project.
Import Anime Shading Plus Plugin: Import the Anime Shading Plus plugin into your current project.
Configure Graphics Settings: In the Graphics settings, make sure that the currently selected Render Pipeline Asset is the one provided within Anime Shading Plus(URP Asset), Or you can manually add the required Renderer Features(see section 4 ) to the Universal Renderer Data asset currently used by your project.
Verify Quality Settings: Ensure that the Render Pipeline Asset specified in the Quality settings on all quality level are the same asset in the previous step.
Test Demo Scene: Open the demo scene and verify that everything displays correctly, including post -processing effects such as outlines. (Note: The demo scene requires importing Text Mesh Pro.)
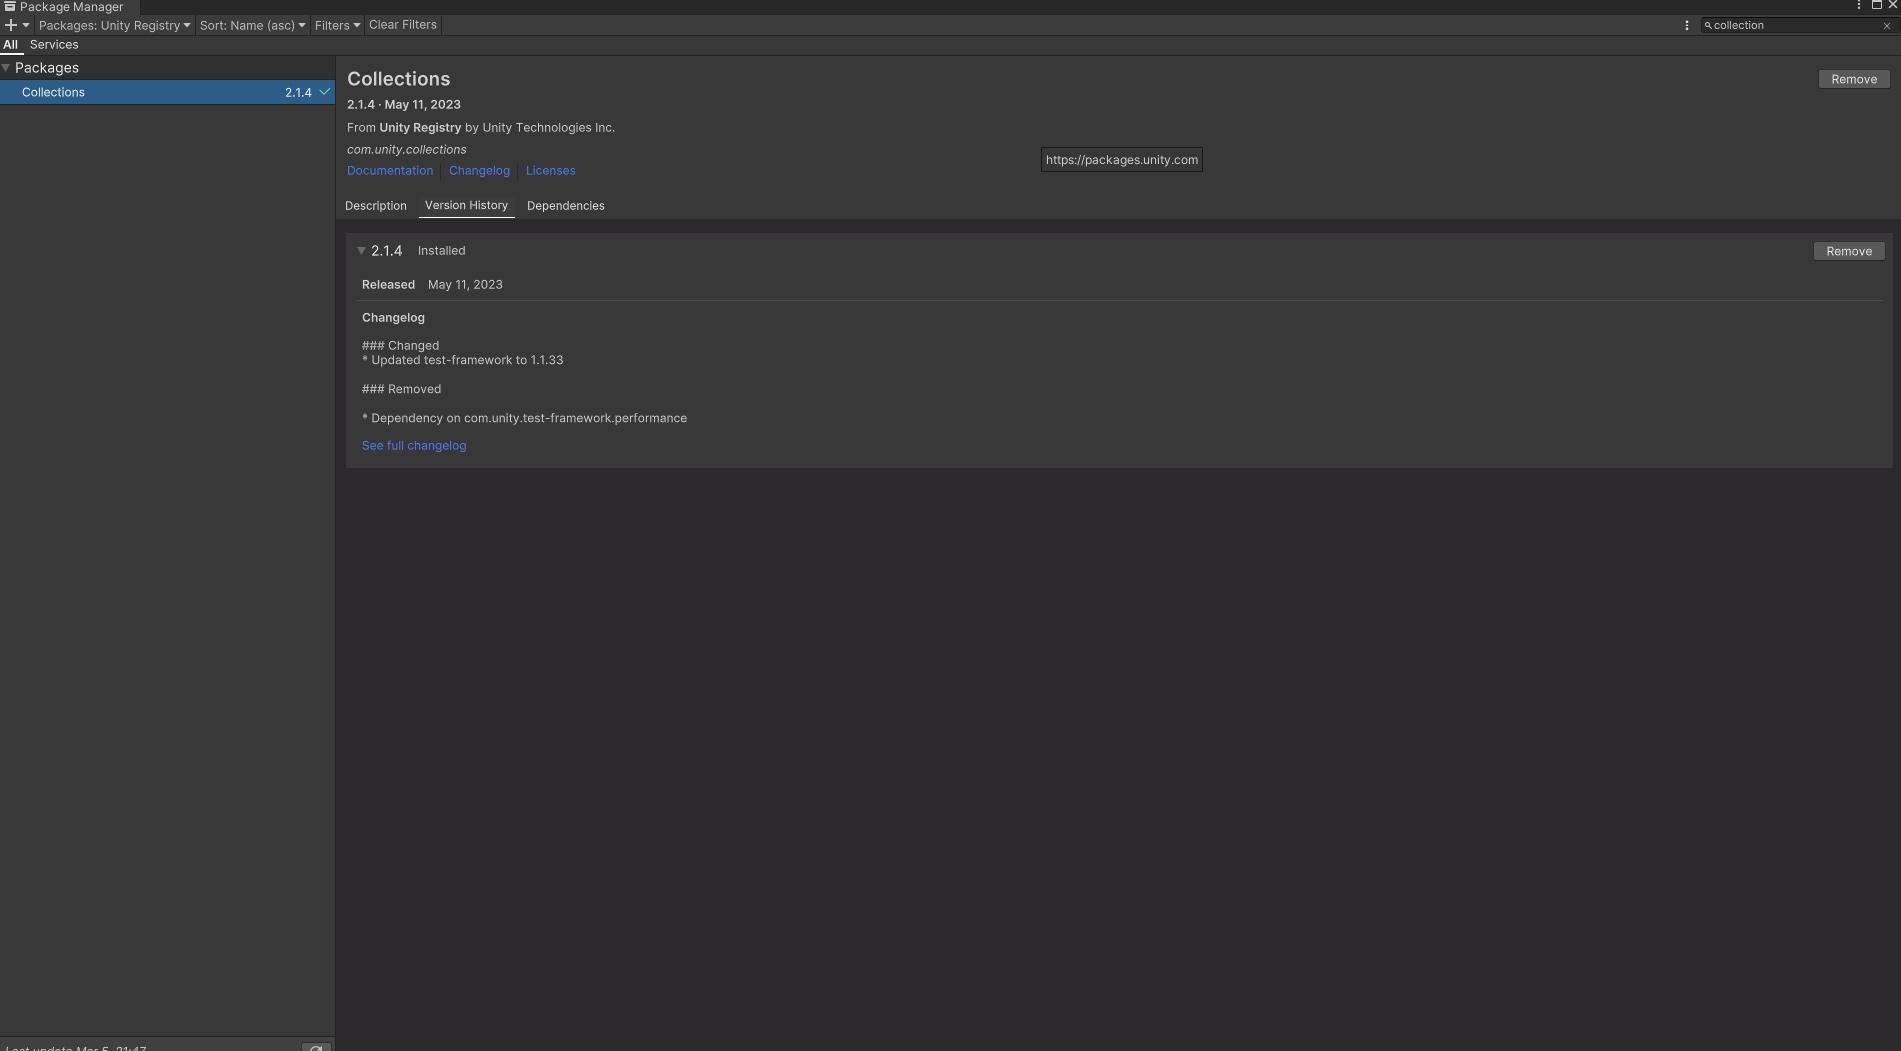
Install Collections Package: Using the Package Manager, install version 1.5.1 or higher of the com.unity.collections package.
💡 The following section of this page explain the detail info about each steps.
Video record of install ASP via package manager
1. Install the corresponding Universal Render Pipeline (URP) version
The currently recommended Unity Editor versions for ASP are:
Unity 2022.3.62f3
Unity 6000.0.68f1
Unity 6000.3.9f1
If you install URP manually from Unity's Package Manager, the recommended URP major versions are:
Unity 2022.3.62f3 → URP 14
Unity 6000.0.68f1 → URP 17
Unity 6000.3.9f1 → URP 17
If you use a different Unity version, make sure the built-in or installed URP package is still compatible with the APIs currently used by ASP.
For detailed installation steps, please refer to:
Installing the Universal Render Pipeline into an existing Project | Universal RP | 12.1.14
You can download and install the latest version of the Universal Render Pipeline (URP) to your existing Project via the Package Manager system, and then install it into your Project. If you don’t have an existing Project, see documentation on how to start a new URP Project from a Template.
💡 Please note that if the URP project itself is created directly from the URP category within Unity Hub, you should pay special attention to the Quality Level section(3) in this page
2. Configure URP Asset for ASP(Anime Shading +)
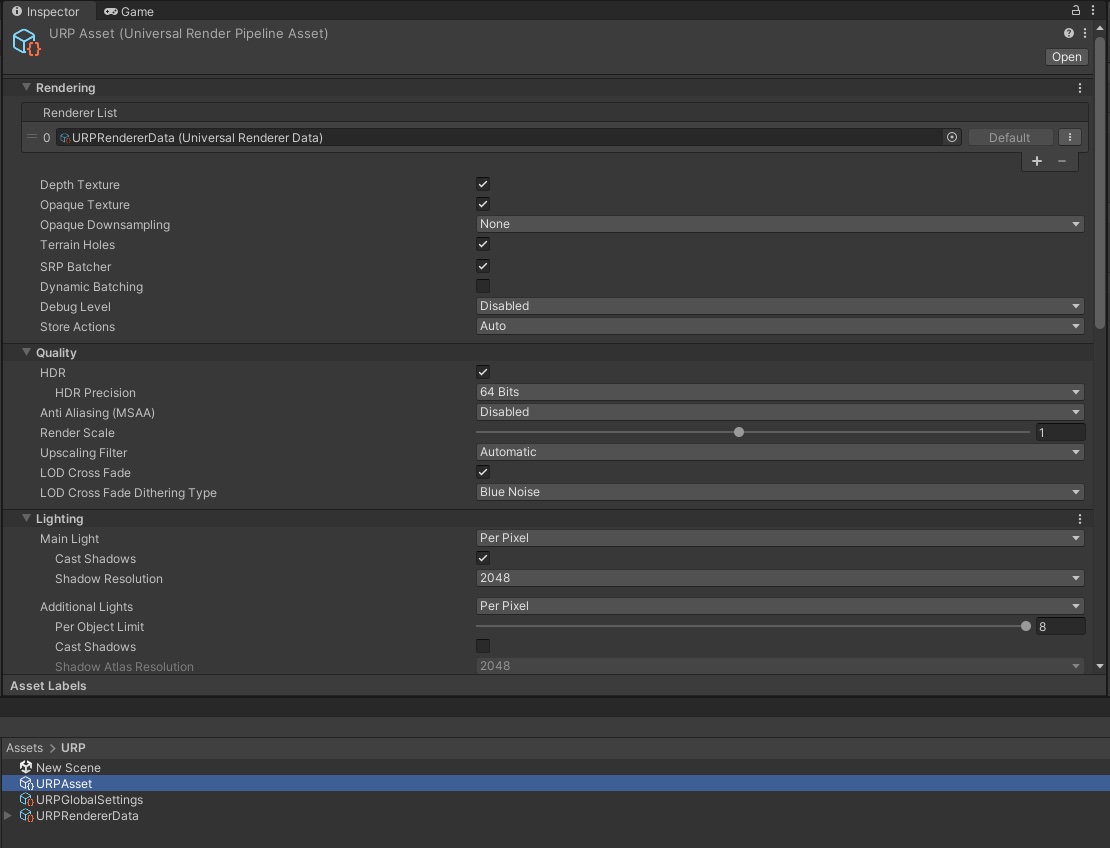
1)URP Asset
The URP asset stores various global graphics settings, including shadow map size/rendering distance, multi-light support, and more.
3. Quality Level and URP Asset (Universal Renderpipeline Asset)
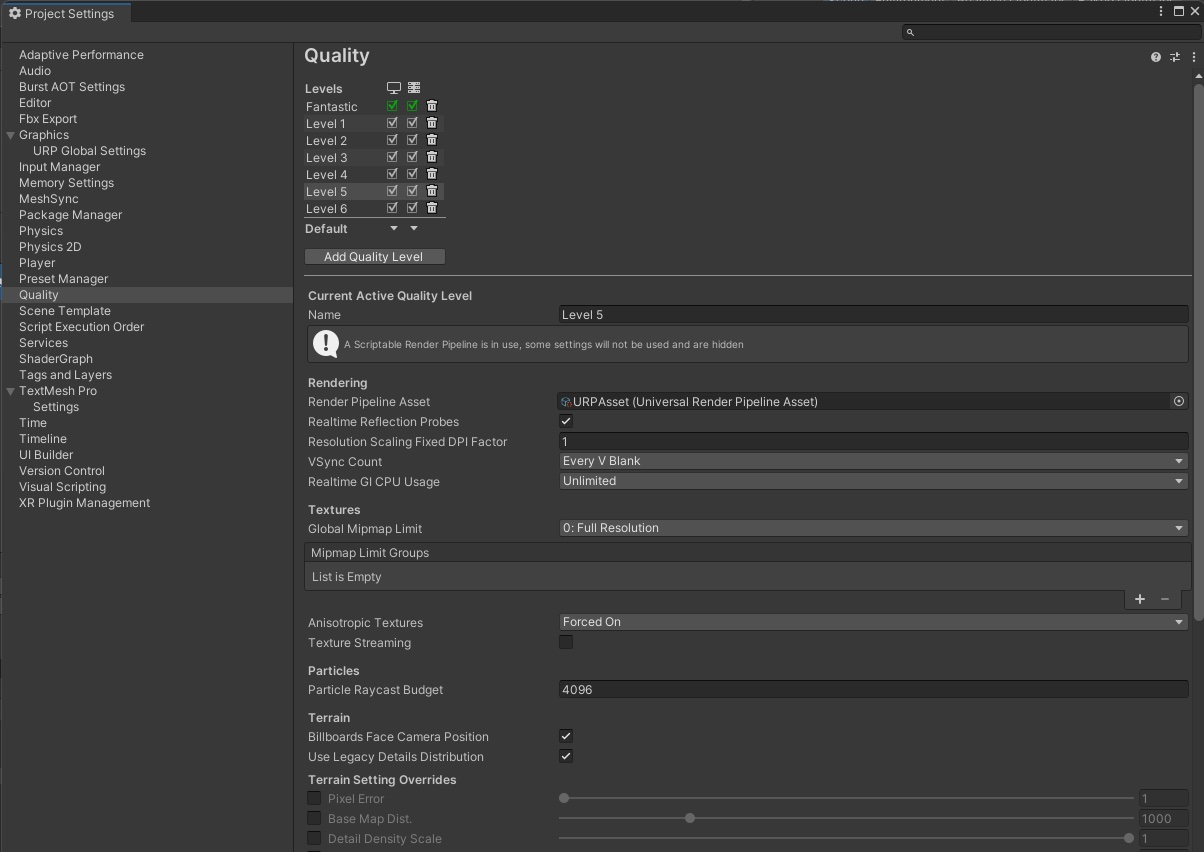
Quality Setting
The same project can have different Quality Levels configured with their own corresponding URP assets. If you create a URP project directly from the URP category in the Unity Hub, there will already be 4-6 different URP assets built-in. Often, users find that the shader effect is missing after building the executable, turns out the quality of the build target itself uses a different URP asset than the one used in the Editor.
4. Add ASP renderer features to the current Universal Renderer Data
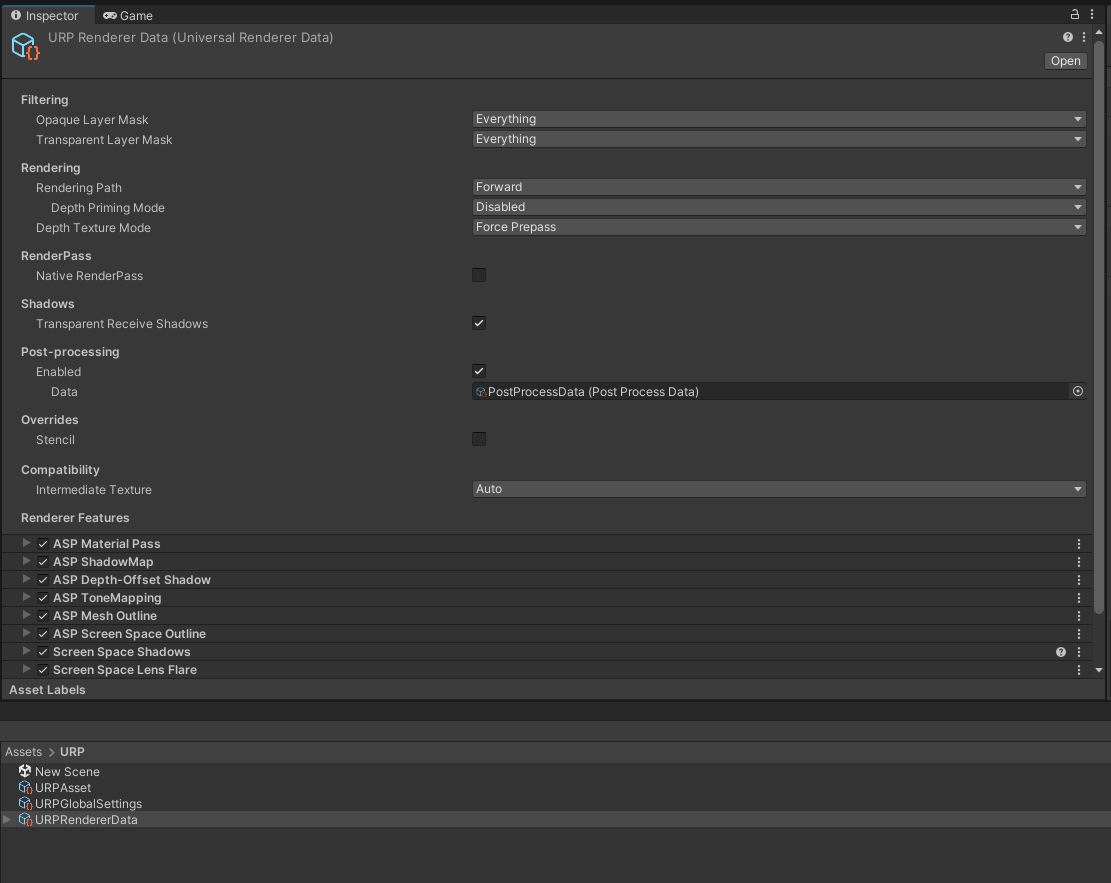
2)Universal Renderer Data
The URP asset points to a Universal Renderer Data (see top of Figure 1) - this renderer data contains the settings for various render passes in the current pipeline. For example, forward/deferred rendering. Custom post processing passes in URP, etc. The additional renderer features included in ASP need to be configured in this renderer data too.
There are a total of 3 basic renderer features required by ASP. Please be sure to add and enable the following renderer features in the renderer data:
ASP Material Pass
ASP ShadowMap
ASP Depth-Offset Shadow
The following renderer features included in ASP plugin are optional. If you need the corresponding functionality, add and enable them to the current renderer data:
ASP ToneMapping - After adding, you can add the Tonemapping effect specially designed for cartoon rendering characters in the camera volume.
ASP Screen Space Outline - After adding, you can add the screen space outline in ASP to the camera volume.
ASP Mesh Outline - After adding, you can use mesh-based outlines.
5. Verify package dependencies (For Mesh-based Outline)
If you need to use the smooth normal tool for mesh-based outline function, It is required to install unity.collection package as well. Search for collection in the Package Manager and install it (version must be greater than 1.5.1).
If you are using Unity 2021, or the default version of the collections package is less than 1.5.1, please follow below steps to manually install the specified version of the collections package:
Open the Package Manager in the Unity Editor.
Click the "+" icon in the upper left corner of the package manager window and select Add package from git URL.
In the URL field, enter com.unity.collections@1.5.1 and click Add.

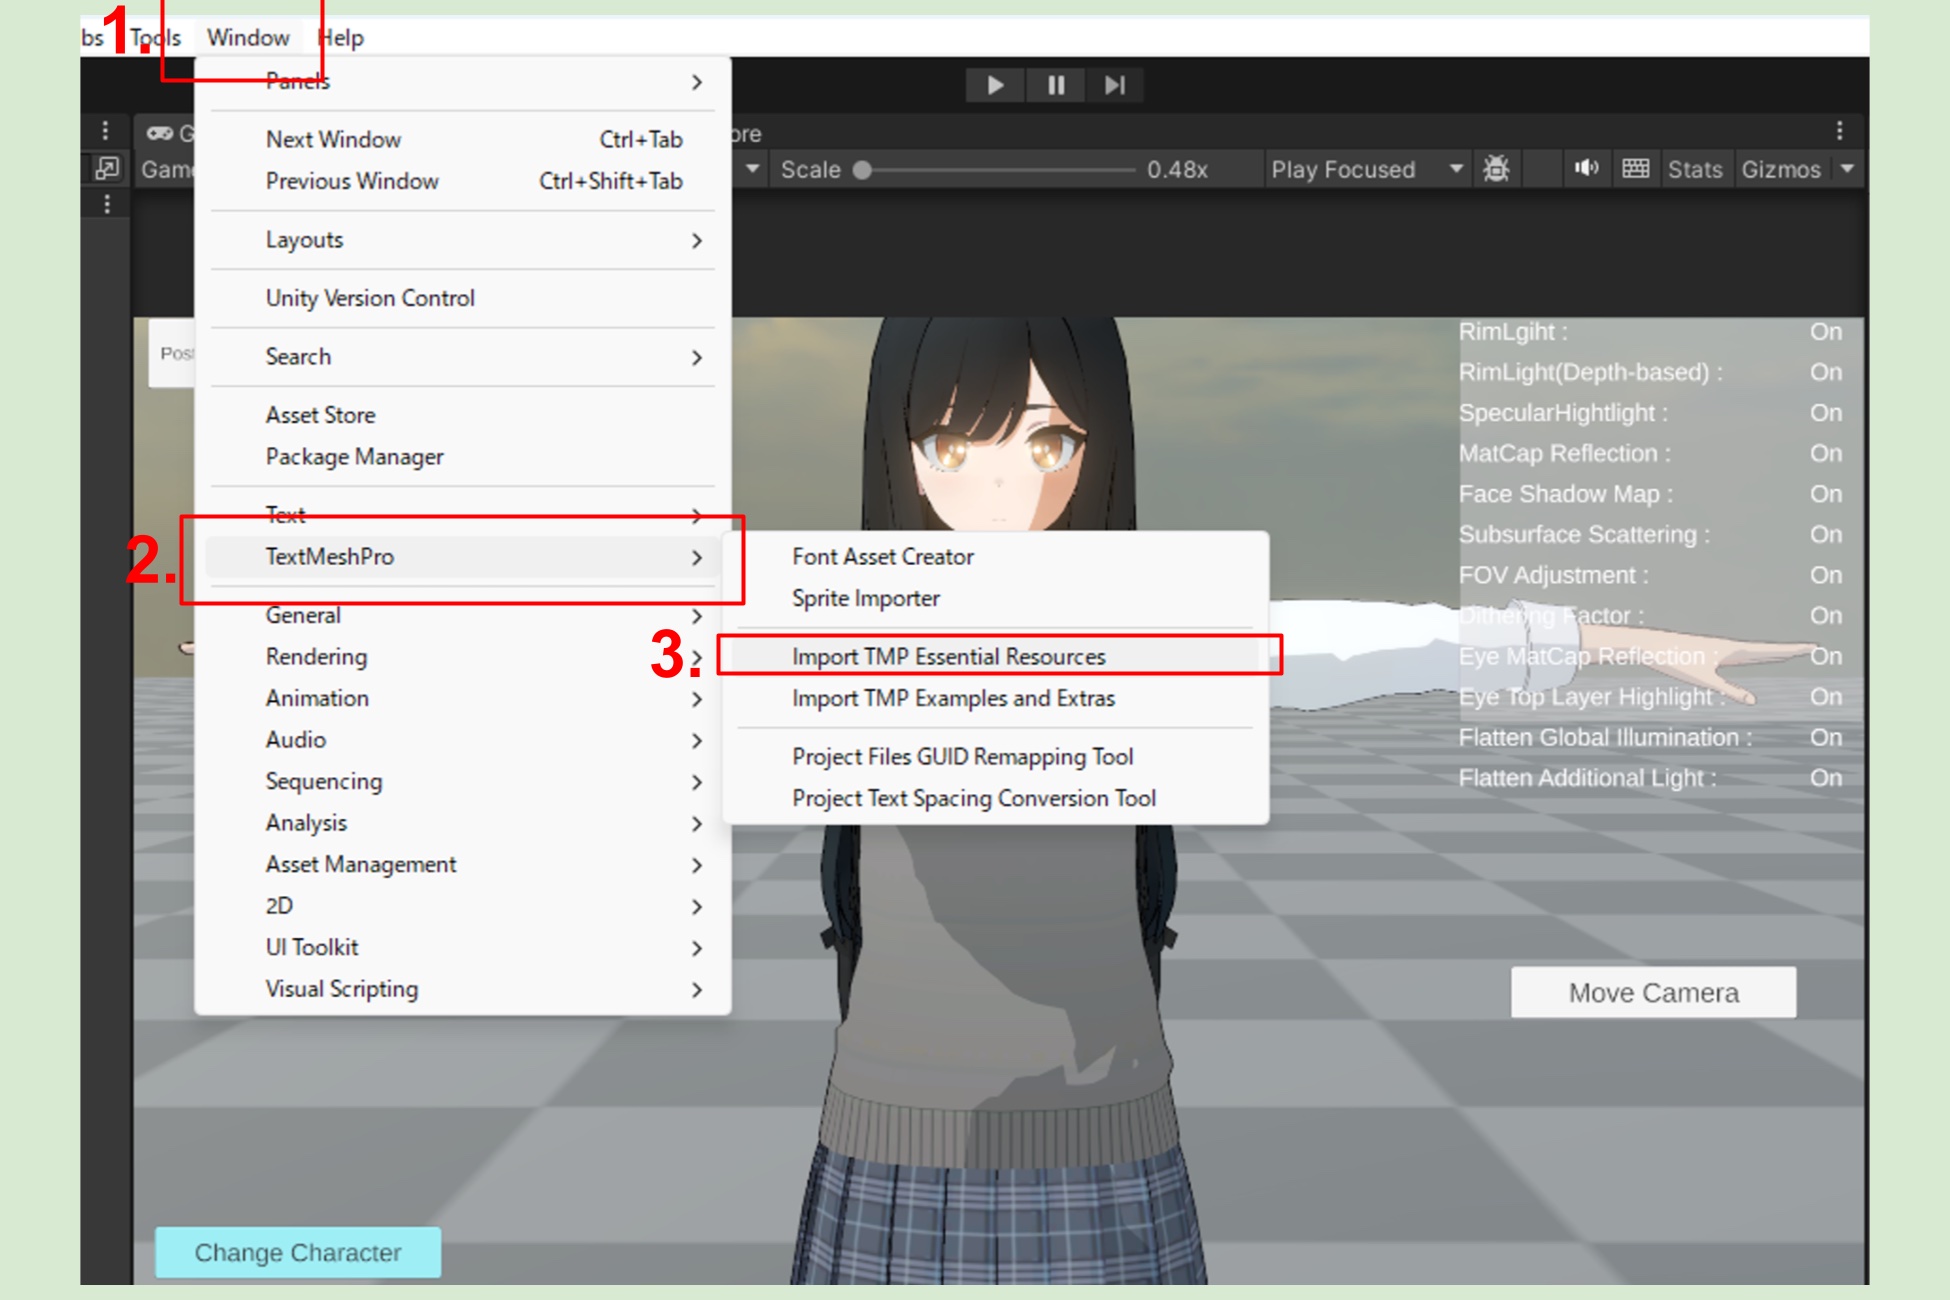
6. Import TMP Essential Resources (For Demo)
The demo scene in ASP uses TextMeshPro to display text on the UI. If you notice that the text on the UI or buttons is missing, it means TextMeshPro has not been properly loaded into the project. (In versions of Unity prior to 2022, a prompt would automatically appear asking whether to install TMPro. This prompt is no longer present in Unity 2023 and later.)
To resolve this, within the Unity Editor, navigate to Window at the top of the window, then select TextMeshPro and finally Import TMP Essential Resources. After importing the necessary resources, reload the demo scene and the TMP text should display correctly.
⏭️ Next Page 2️⃣ 2. Setup ASP Character Panel (Important)